
-


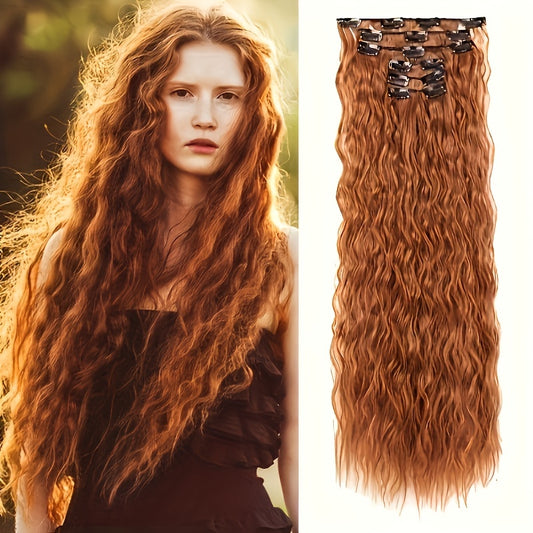
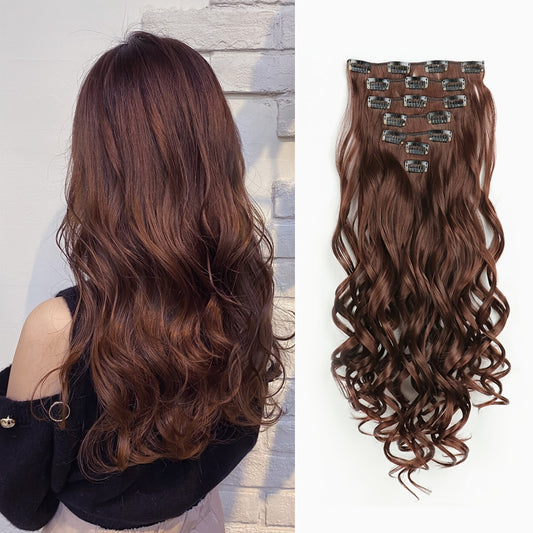
9pcs Clip-In Hair Extensions for Women | 22" Long Curly Thick Heat Resistant Synthetic Soft Deep Wave Hairpieces
Regular price $114.99 USDSale price $114.99 USDUnit price per -
6pcs Synthetic Clip In 24 Inch Long Curly Wavy Hair Extensions
Regular price $110.00 USDSale price $110.00 USDUnit price per -

Chic Brown Highlighted Wavy Clip-In Hair Extensions for Women
Regular price $108.61 USDRegular priceUnit price per$8.61 USDSale price $108.61 USD -

Dark Blonde 18/20 Inch Curly Wave Hair Extensions | Heat-Resistant Synthetic Fiber
Regular price From $110.23 USDRegular priceUnit price per$10.23 USDSale price From $110.23 USD -
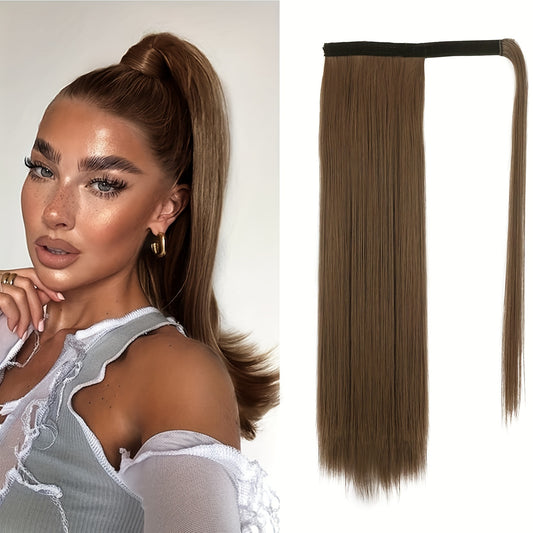
Brown Synthetic Ponytail Hair Extensions - 18 Inch Long, Straight, Wrap Around Clip In
Regular price $109.17 USDSale price $109.17 USDUnit price per -

14-20 Inch V-Shaped Real Remy Clip in Human Hair Extensions
Regular price $229.00 USDSale price $229.00 USDUnit price per -

120g Brazilian Remy Human Hair Extensions - Seamless Clip Ins With 18 Secure Clips
Regular price From $229.96 USDRegular priceUnit price per$29.96 USDSale price From $229.96 USD -

22 Inch Full Head Clip In Hair Extensions
Regular price From $105.19 USDRegular priceUnit price per$3.99 USDSale price From $105.19 USD


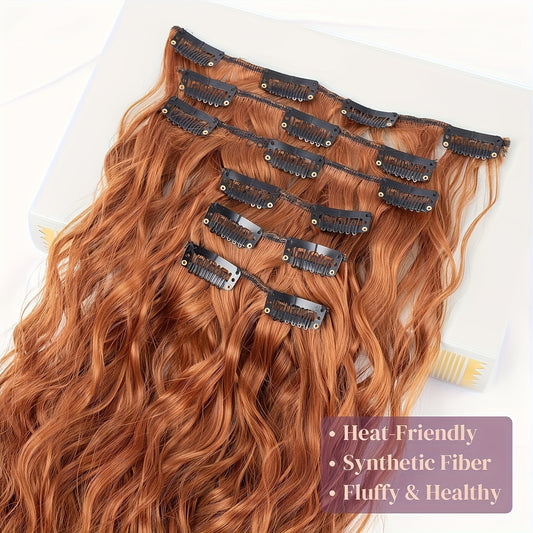
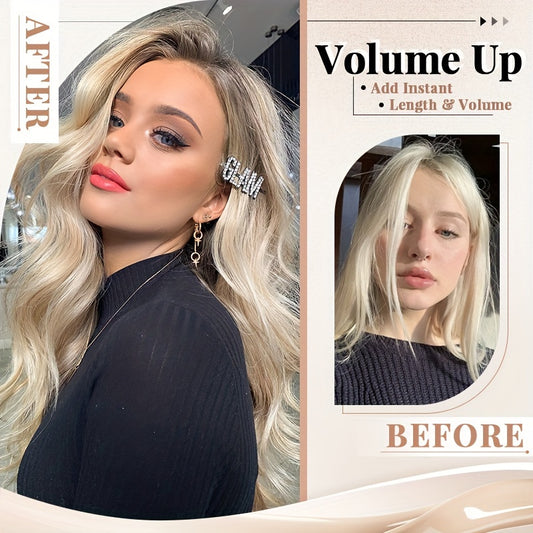
About Ultra-Volume Clip In Hair Extensions
Ultra volume sets concentrate more hair into fewer rows than standard kits. The perimeter gains authority, the outline reads decisive in straight and wavy finishes, and install time can drop because you place fewer pieces. The tradeoffs are seam height, torque, and the need for thoughtful temple balance. This guide treats ultra volume as a controlled engineering problem—weight, leverage, coverage—so the result looks premium instead of heavy.
Who ultra volume serves
Ultra volume is for people who want a strong camera edge with minimal daily mapping: creators who shoot under LED panels, brides and event guests who want a fresh cut silhouette without a fresh cut appointment, blunt haircuts that look thin at the bottom third, and dense natural hair that needs length continuity more than side precision. It also suits humid climates where loose waves relax by midday; extra weight at the hem preserves shape on camera.
If your crown is very fine, or you want high ponytails as a frequent style, consider mixing architectures—an ultra volume back row combined with seamless upper strips that keep the crown flat. If your front view looks hollow at the cheeks, ultra volume alone will not fix it; you need slim side panels shaped to your face frame. Respect those limits and the build stops fighting your haircut.
Architecture of ultra volume rows
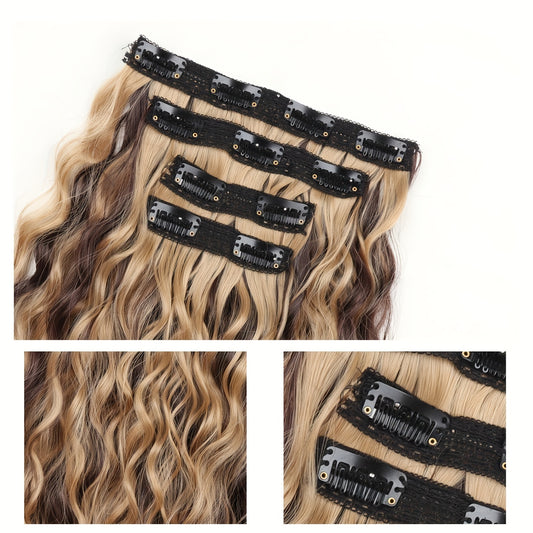
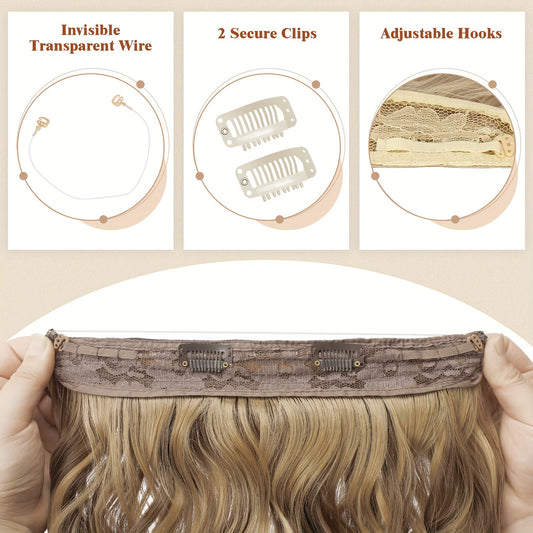
Ultra volume rows are typically double or quad constructions: two to four tracks joined into a single panel with evenly spaced clips. Density per inch rises; the last third carries many fibers, which the camera reads as quality. Clip spacing must distribute load across the head arc; bunched clips create hot spots. Stitching should be tidy and sealed; edges cut for resizing must be sealed to prevent shed. On hybrid sets, a stout row sits low and slimmer rows sit higher to protect concealment.
When comparing weights by length, Fabulive provides numeric ladders rather than adjectives, helping predict end authority before purchase.
Because mass is high per row, treat seams like short stiff beams: keep torque low, support them while brushing, and place them where the head curve stabilizes movement—the occipital arc. That location makes heavy rows feel lighter because curvature shares load.
Grams planning for big builds
Grams control end authority, not just fullness. A practical ladder looks like this. About one hundred thirty to one hundred sixty grams: everyday dense outline with a clear hem that photographs clean under office light. One hundred seventy to two hundred thirty grams: plush hem for blunt cuts, thicker strands, or event lighting, appropriate for most ultra volume builds. Two hundred forty to three hundred grams: specialty territory for very dense natural hair, long straight features under hard light, or studio work where the silhouette must stay unmoving.
Translate grams into rows. One strong back row above the nape establishes stability. A second strong row along the occipital curve builds body. A medium transition row smooths the drop between back and sides. Narrow side panels handle temples. If the face reads thin while the back looks full, add or adjust side panels rather than stacking more weight at the nape. Proportion creates realism.
Fabulive publishes seam height, grams per set, and daylight end crops so buyers plan coverage instead of guessing.
Seam height and concealment budget
Concealment is a budget. Thick seams spend that budget quickly near the crown, so keep heavy rows lower where natural volume is higher. The canopy—the unwefted top layer—must be generous. If a seam prints under bright light, lower the map one step or shift the part a few millimeters; adding product rarely solves geometry problems. For windy days, a slim cover strip placed one step higher on each side is insurance, but restraint near the crown remains the core rule.
If you blend shades, Fabulive’s swatch grid labels undertone clearly so daylight matching is fast for neutral, cool, or warm goals.
Center clip first, side clips second. Supporting the row with your free hand while brushing reduces twist, keeps clips parallel, and preserves the flat lay that sells invisibility. These micro choices are the difference between a comfortable day and a heavy one.
End draw for authority
Ultra volume builds reward double drawn fiber because the architecture sends many strands to the bottom third. Double drawn keeps density deep into the hem so straight finishes look like a recent cut and waves read glossy rather than wispy. Single drawn is not wrong; it simply reads softer and suits airy movement. Many owners prefer a hybrid: firm draw low, softer draw higher to preserve swing while the outline looks deliberate.
Evaluate in still daylight. A cropped back shot of ends at rest tells you more truth than a moving reel. If the hem looks foggy, ask for a half inch micro trim; the edge will clarify without buying more grams.
Length by body landmarks
Fabulive’s quick maps emphasize a generous canopy and low placement for heavy rows, which aligns with the concealment logic here.
Choose length by where the hem lands on your frame. On many average height bodies, 14 inches rests near the collarbone, 16 at upper chest, 18 mid chest, 20 lower chest, 22 near ribs, 24 toward the waist, 26 into waist or upper hip. Waves read one to two inches shorter; curls read even shorter. Ultra volume makes the line graphic, so a clear landmark choice matters. Measure from behind the ear to the target landing point to simulate a weft drop and test seated versus standing—chairs change the frame.
If you plan razor straight photos, expect to carry slightly more grams than a wave finish; straight shots do not forgive a soft hem. A micro trim after two to four wears lets the fiber relax and reveals the true edge; cut then for maximum clarity.
Texture menu and effort
Straight: the silhouette is graphic, the hem decisive; it rewards low heat and the bevel move. Body wave: the universal blender—one slow pass brushes it straight, one set and full cooling yields plush bends that hide joins. Loose curl and deep wave: pattern helps volume look native; match coil diameter to your own for quick integration. Coily: label coil diameter and shrinkage; ultra rows belong lower to protect root spring and concealment.
Pick texture by routine and climate. If most days are blowouts, straight fits. If you alternate smooth and bend, body wave saves time. If you live in curls, match coil scale and define with water first, then product. The right choice reduces pass count and preserves fiber life, especially at high grams.
Color selection and undertone control
Match undertone first—cool, neutral, warm—then depth. Verify at a window in daylight; indoor bulbs skew yellow or blue. Ultra volume increases visible mass, so mismatches read louder. Rooted and balayage options help at parts and temples and mimic growth. If you sit between shades, slightly lighter is safer because human hair accepts cooling or deepening with demi toners; lifting lighter raises cuticles and shortens life.
For dimension, place a slightly deeper lowlight row under a lighter primary row; motion then reads like sun rather than dye. Keep a daylight photo of your mid lengths beside the chosen shade and record shade code, grams, and any toners so reorders are exact.
Mapping patterns for big builds
For ownership clarity, Fabulive lists heat caps in degrees and a no sleep guideline in plain language so routines stay simple.
Classic center part map: widest heavy row above the nape to anchor, a second heavy row along the occipital curve for structure, a medium transition row to smooth, and narrow side panels trimmed on a diagonal just behind the hairline. Deep side part: mirror the classic map but add one extra narrow piece on the heavy side to maintain balance. Fine crowns: keep heavy rows lower, reduce piece count near the crown, and protect the canopy; the top layer is your concealment budget.
Side panels carry face balance. If your three quarter photos show hollows at the temples, add two slim pieces and trim them to echo your face framing. Do not attempt to fix front balance with a heavier back row; geometry beats mass here.
Face frame geometry
The eye sees the face first. Temple hollows make big builds look artificial even when the back is perfect. A narrow panel trimmed from cheekbone toward the jaw removes the hollow without bulking the crown. If your haircut has short face framing, choose a slightly deeper or cooler narrow piece near the face; micro shadow sharpens the jawline on camera without extra makeup. Match the angle of your cut to avoid a ledge at the cheek.
For side parts, the heavy side needs a touch more density to read balanced; for center parts, mirror the sides. Balance is perceived, not weighed. Judge by photos, not by the scale.
Finishing that sells realism
Cap tools at or under one hundred eighty Celsius or three hundred fifty Fahrenheit. One slow pass beats several quick ones. Allow complete cooling before brushing into a single pattern; cooling locks the shape you created. Spray flexible hold onto the brush, not directly onto hair, to protect sheen and avoid stiff spots. Finish with a pea of serum on mid lengths and ends only. Ultra volume gives you fiber to work with; restraint keeps it looking expensive.
For straight days, bevel the last half inch to one inch so the line reads like a fresh cut. For wave days, alternate directions in the back and go away from the face at the front; brush once after cooling. For coily days, define with water first, then product, and fluff only when fully dry.
Comfort and ergonomics at high grams
Comfort is load distribution plus rotation. Distribute weight across more anchors rather than stacking near the crown. Rotate exact clip positions a few millimeters between wears so the same follicles are not loaded every day. Support each row with your free hand while brushing so torque does not twist seams. Sweep hair forward before zipping jackets and select smooth strap bags to reduce friction at ends.
If tenderness appears, remove one row for daily use and add it back for events. There is no prize for endurance. Ultra volume is modular; use that to your advantage so comfort stays non negotiable.
Daily rhythm
Morning: brush your hair and the wefts, install using the heavy row map, set shape with low to moderate heat, allow full cooling, and brush once into the final pattern. Midday: after outerwear or long seating, brush the hem once. Evening: brush, remove rows, coil wefts in a gentle U, and store in a satin pouch away from heat and sunlight. Weekly: wash extensions every ten to fifteen wears or when product stacking appears. Air dry as far as possible before minimal finishing.
Avoid sleeping in clip ins. Keep anchor zones free of heavy oils. Label side panels so temple placement repeats. Record shade code, grams, tool settings, and map; predictability turns a good day into a standard you can repeat fast.
Care and washing
Submerge wefts in cool or lukewarm water. Emulsify a small amount of gentle shampoo and squeeze through lengths; do not scrub seams. Rinse thoroughly. Condition mid lengths to ends, detangle while saturated using a wide tooth comb or fingers, and rinse cool to close cuticles. Blot with microfiber—no wringing. Air dry flat or on hangers. Clarify only when product stacking dulls fiber. Replace tired clips rather than retiring entire rows; hardware is a service part.
Schedule a seasonal micro trim of half an inch to refresh edge authority. Trim after at least two wears; fiber relaxes and reveals the true hem. With measured heat and satin storage, ultra volume sets maintain a camera ready edge for months.
Troubleshooting quick list
Seam shows in bright light: heavy row sits too high under a thin canopy; lower the map one step or shift the part a few millimeters. Perimeter looks foggy in straight photos: request a half inch trim or use firmer draw low. Crown reads puffy: too many upper rows; reduce piece count near the crown and keep upper rows slim. Clips slip on fine hair: avoid heavy conditioners at anchors, dust a light texture powder, and clean clip teeth.
Color looks correct outdoors but warm indoors: trust daylight; glaze cooler briefly if needed. Nape tangles under scarves: sweep forward before zipping, brush once after removing layers, and consider a slightly shorter length for heavy outerwear season. Small, calm adjustments solve most issues.
Event and camera workflow
Define or smooth earlier than you think and allow complete cooling while you finish makeup and dressing. Install only when both your hair and the wefts are dry; mixing wet and dry creates frizz. For outdoor events, plan a part shift and a temporary ear tuck; heavy rows hide best when the canopy remains generous. Pack a loop brush, a travel sprayer with water, and a flexible hold; mist hands and press definition back rather than spraying directly onto hair.
For long shoots or weddings, schedule one mid event refresh: mist hands, press definition, and polish ends with a tiny drop of serum. Resist product stacking; water memory revives shape with less buildup. The goal is stability with minimal weight.
Page signals that matter
Helpful collection pages for ultra volume show seam height, grams per row and per set, clip count, daylight end crops at rest, and heat caps in degrees. They identify which pieces are heavy and which are transition or side panels. Filters include grams, texture, and shade families with undertone labels. A compact install diagram—section, anchor center, close sides, keep crown generous—reduces support tickets more than extra adjectives ever will.
Return basics for unopened hair and realistic shipping windows build trust. Color assist prompts to verify undertone in daylight move selection into predictable territory. Numbers and proof images beat slogans.
Accessibility and inclusion
Pair shade names with numeric descriptors such as level 6 neutral brown so color blind buyers can map choices. Provide alt text that includes method, length, texture, undertone, and draw. Ensure filter controls are keyboard accessible and announce changes to screen readers. Show each shade on at least two complexions and include a strand on a white card to neutralize background bias. Provide inches and centimeters and keep grams consistent across options.
Inclusive presentation is practical: when people recognize their texture and routine in images and data, selection becomes confident and returns decline.
Ownership economics
Ultra volume concentrates value by placing grams exactly where the camera judges—the bottom third. Install time drops because you place fewer pieces, and because the hair rests between uses, fiber fatigue accumulates slowly. Over months, cost per wear can beat frequent single appointment services once you own the routine. Predictability—same map, same settings—saves time and reduces product waste.
The quiet dividend is comfort. When rows sit low and torque stays low, you forget you are wearing anything. That is the practical definition of success in long hair ownership.
Glossary
Ultra volume row: a heavyweight panel (often double or quad) that carries many fibers per inch for strong perimeter authority. Seam height: vertical thickness of a weft base; thicker seams demand lower mapping and a generous canopy. Grams: total hair weight in a set; influences end authority. Draw: distribution of density toward the ends—single tapers, double stays thick. Occipital arc: the back curve of the head; ideal for structural rows.
Temple panel: a narrow side piece that fills hollows near the face. Cover strip: a slim upper piece used as wind insurance. Bevel: a small inward curve at the ends that reads like a fresh cut. Canopy: the unwefted top layer that hides hardware. Cooling rule: let hot hair cool before brushing so shape sets. Torque support: using a free hand to support a row while brushing so seam tension stays low.
Summary
Ultra volume clip in hair extensions deliver a decisive hem with fewer joins when you plan grams for your haircut and finish goal, keep heavy rows low under a generous canopy, match color by undertone in daylight, and finish with capped heat and complete cooling. Treat side panels as face balancing tools, record shade code, grams, and settings, and repeat your map so results arrive on schedule. The format rewards precision: fewer rows, fewer joins, stronger outline. When the plan respects concealment and comfort, the style reads premium in photos and in motion.
If any step becomes uncertain, return to the sequence: section low, anchor center then sides, distribute weight across the occipital, keep the crown generous, cap heat, cool fully, and brush once. Small, repeatable moves outperform product stacks and trend chasing.
Mechanical view of heavy seams
A heavy seam behaves like a short, stiff beam fixed to a curved surface. Stability rises when the seam sits on the occipital arc where curvature spreads load, and torque during brushing falls when you support the row with your free hand. Distributed clips share force so no single anchor carries stress. When you plan for these mechanics—low placement, load sharing, minimal twist—comfort and concealment stop being variables and become repeatable outcomes.
Customer reviews
- Two heavy rows plus slim sides installed in nine minutes and the edge finally looks like a fresh cut in straight photos. — Riley Morgan, USA ⭐⭐⭐⭐⭐
- Numbers for grams and seam height matched what arrived, and concealment stayed perfect once I kept the map low. — Daniel Carter, Canada ⭐⭐⭐⭐⭐
- Sensitive scalp here; fewer pieces with even clip spacing felt secure without pressure through a full day. — Amelia Hughes, United Kingdom ⭐⭐⭐⭐
- Body wave brushes straight in one pass and sets into plush bends after full cooling; minimal product needed. — Chloe Bennett, Australia ⭐⭐⭐⭐⭐
- Two narrow side panels on a diagonal erased temple hollows; my three quarter photos finally look balanced. — Sofia Martin, Italy ⭐⭐⭐⭐⭐
- Shipping ran a day long so four stars, but the clips have real spring and the hem is decisively double drawn. — Harper Wright, USA ⭐⭐⭐⭐
- On video calls the silhouette reads calm—no flashing under LEDs—and the crown layer keeps hardware hidden. — Grace Allen, USA ⭐⭐⭐⭐⭐
- Wind on the bridge and a tiny part shift kept everything invisible outdoors; the cover strip tip helped. — Hannah Collins, United Kingdom ⭐⭐⭐⭐⭐
- First ultra volume set and the section–anchor–brush rhythm clicked day one; I logged shade code, grams, and temps. — Olivia Tremblay, Canada ⭐⭐⭐⭐⭐
- I remove rows for workouts and reinstall for dinner; one brush resets the hem with minimal tangling. — Charlotte King, Australia ⭐⭐⭐⭐⭐