
-

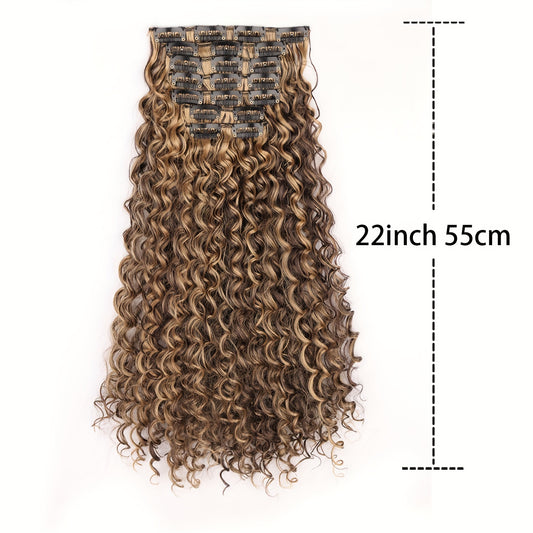
9pcs Clip-In Hair Extensions for Women | 22" Long Curly Thick Heat Resistant Synthetic Soft Deep Wave Hairpieces
Regular price $114.99 USDSale price $114.99 USDUnit price per -

Chic Brown Highlighted Wavy Clip-In Hair Extensions for Women
Regular price $108.61 USDRegular priceUnit price per$8.61 USDSale price $108.61 USD -

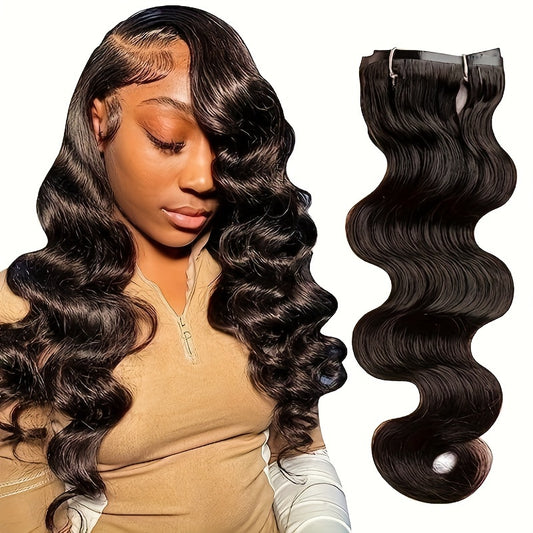
Clip In Hair Extensions, 4pcs Lace Weft Hair Extensions
Regular price $112.60 USDRegular priceUnit price per$12.60 USDSale price $112.60 USD -

10pcs Soft Human Hair Mini Tape In Hair Extensions
Regular price From $111.70 USDRegular priceUnit price per$11.70 USDSale price From $111.70 USD -
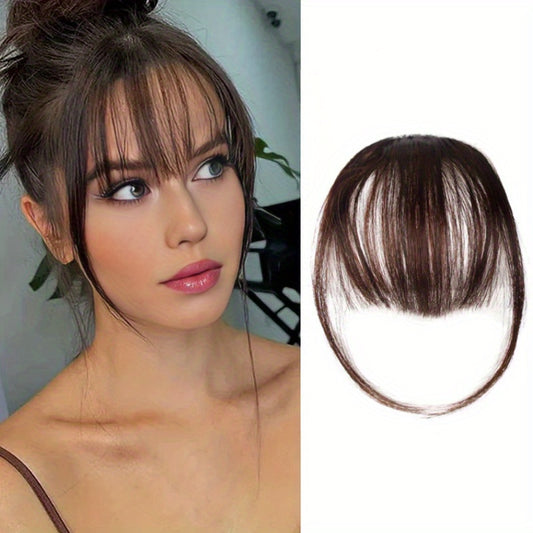
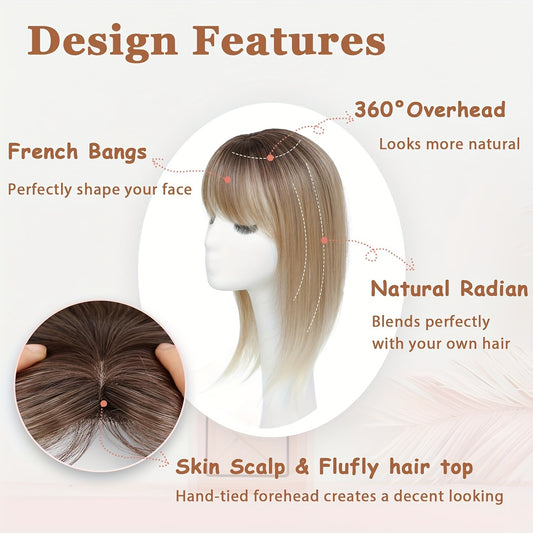
Women's Clip-In Air Bangs Hair Extensions - Loose Curly, Basic Style, Suitable for All
Regular price $105.00 USDRegular priceUnit price per$4.63 USDSale price $105.00 USD -

Chic Afro Curly Clip-In Hair Extensions for Women
Regular price $110.00 USDRegular priceUnit price per$10.81 USDSale price $110.00 USD -

4pcs Lace Weft Hair Extensions | 14 Inch Short Wavy Invisible Hair Extensions
Regular price $110.00 USDSale price $110.00 USDUnit price per -

8pcs/1 Set with 18 Clips Body Wave Human Hair Clip In Extensions 120g
Regular price $259.00 USDSale price $259.00 USDUnit price per -

120g Brazilian Remy Human Hair Extensions - Seamless Clip Ins With 18 Secure Clips
Regular price From $229.96 USDRegular priceUnit price per$29.96 USDSale price From $229.96 USD -

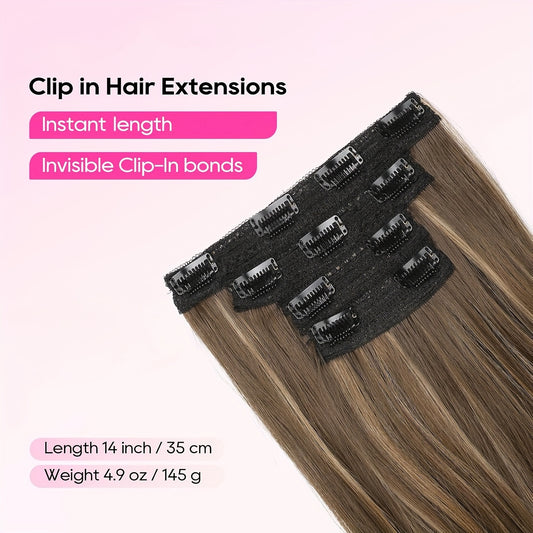
Clip In Hair Extensions Real Human Hair | Remy Human Hair Extensions Clip Ins For Women
Regular price $229.00 USDSale price $229.00 USDUnit price per -
Cover Clip-In Bangs Hair Extensions for Women
Regular price $109.00 USDSale price $109.00 USDUnit price per -

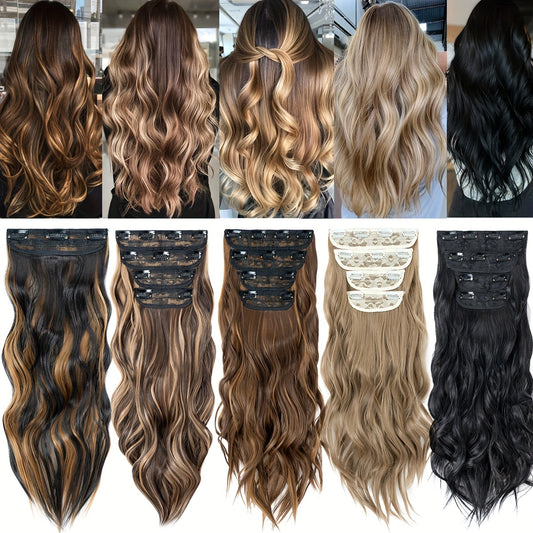
4Pcs/set 22inch Long Curly Hairpieces Ombre Hairpieces for Women
Regular price $115.45 USDSale price $115.45 USDUnit price per


Black Hair Extensions: A Premium Collection Guide to Natural Volume, Seamless Blending, and Modern Contrast
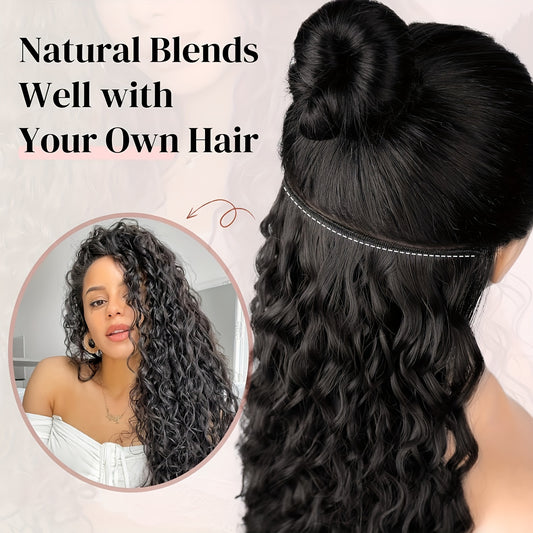
Black hair extensions can be the most flattering “quiet upgrade” in beauty—when they’re chosen with the same precision a stylist uses in a chair. Dark shades amplify everything: the quality of the blend, the realism of the texture, the way hair reflects light, and whether the perimeter looks naturally full or obviously “added.” This collection guide is designed to help you make decisions that hold up in daylight, warm indoor lighting, and photos, with a practical framework for method selection, density planning, and styling strategy. Begin at Fabulive hair extensions for natural-looking everyday confidence, then use the guide below to browse with clarity rather than guesswork.
Internal linking placeholder: Add a link here to “Shade Match Help.”
Internal linking placeholder: Add a link here to “Shipping & Returns.”
Internal linking placeholder: Add a link here to “Hair Extension Care Essentials.”
Short intro above the product grid (80–120 words)
Shop black hair extensions with a plan: match undertone and finish first, then choose the method that fits your schedule. This collection includes classic black, jet black, ash-black balayage, and intentional contrast blends (blonde or silver), plus clip-in, tape-in, and micro ring options for different wear patterns. Use the guide below to decide how much hair you truly need, what looks most natural in daylight, how to avoid visible blend lines at the ends, and how to style for everyday polish or photo-ready moments. Then browse the grid confidently, knowing what you’re selecting and why.
What this collection is and who it’s for
This collection is built for people who want black hair extensions that read as “my hair on my best day,” not a separate layer. It includes deep black families for seamless blending, jet black options for crisp polish, ash-black balayage for softened dimension, and contrast blends that add intentional brightness or cool tone without requiring permanent dye. It also spans multiple attachment methods, because realism depends as much on routine fit as it does on color.
It’s for first-time extension wearers who want an approachable way to add fullness, upgrade thin ends, or create event hair without a steep learning curve. It’s also for experienced wearers who care about the details that make dark shades look expensive: the perimeter sits naturally, the hair moves like real hair, the finish reflects light in a believable way, and the sides don’t reveal placement when you turn your head or tuck hair behind your ear.
This collection is especially useful if any of these feel familiar: your hair is dense at the roots but light at the ends; your haircut has grown out and lost shape; your ponytail looks smaller than you want; you want photos to show hair that looks “finished”; or you want to experiment with contrast without bleaching, repeated toning, or long-term color maintenance. If your starting point is “I want to shop the core category first,” begin with black hair extensions for seamless length-and-volume shopping and then refine using the decision framework below.
Why this category matters now (freshness, trends, real-life use)
Black hair extensions matter because modern styling happens across multiple lighting environments in a single day: bright office lighting, outdoor daylight, warm indoor restaurants, and cameras that flatten dimension while exaggerating shine. Dark shades can look luxuriously dense and polished across these settings when the match is right, but they’re also the quickest to reveal mismatches. A slightly wrong undertone can look like a separate layer. A uniform finish can look flat. Poorly distributed density can create crown bulk or a harsh transition at the ends.
At the same time, trends have shifted toward intentional simplicity. Jet black has returned as a sleek, timeless statement for people who love clean silhouettes and refined contrast. Ash-black dimension and balayage variations are increasingly favored by shoppers who want depth without harshness. And contrast blends—black paired with blonde or silver—have evolved into wearable options when the transition zone is controlled and the texture supports the blend. Extensions are the practical bridge: you can test the aesthetic, wear it selectively, and adjust it as your wardrobe, seasons, and routines change.
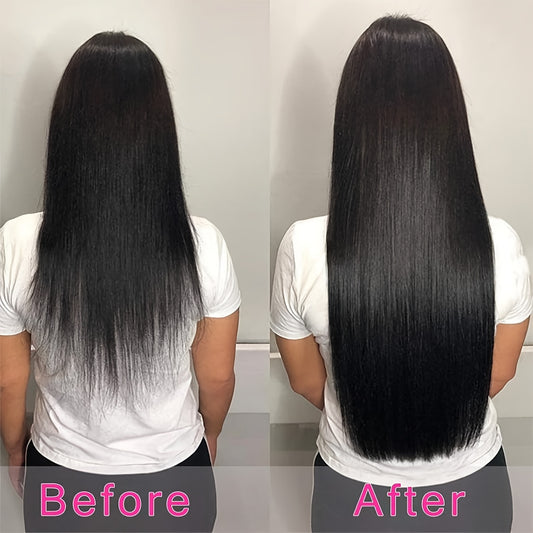
Most importantly, the right extensions reduce effort. A well-chosen set strengthens the perimeter and fills the mid-lengths where hair often looks sparse, making hair look healthier and more finished without forcing complicated styling every day. The goal is not excess hair. The goal is a believable silhouette you can live in.
How to choose the right option (Decision Framework)
Decision Framework
- Goal → length, volume, perimeter thickness, face framing, or contrast
- Shade/undertone → neutral black vs cool jet black vs ash-softened dimension
- Texture/finish → straight, softly waved, or wavy movement that matches your ends
- Construction/type → clip-in, tape-in, micro ring, or fringe/face-framing pieces
- Weight/coverage → enough density to look real without bulk, tension, or heaviness
- Occasion/frequency → daily wear, weekends, travel, or special events
- Care tolerance → how much washing, detangling, and heat styling you will realistically do
- Budget/value → prioritize longevity, reusability, and believable finish
How to choose black hair extensions for thin hair right now without stressing your roots
If your hair is fine or thin, the most natural result usually comes from strategic density rather than maximum coverage. Start by supporting mid-lengths and ends where fullness is most visible, and keep the crown lighter so your natural hair can camouflage attachment points. Avoid stacking heavy pieces high on the head, which can create bulk and discomfort. If you want a quick, non-negotiable rule: the hair should feel wearable first and look fuller second—because tension and crown bulk are the fastest ways to make dark extensions look obvious.
What black hair extensions look most natural in daylight
Daylight reveals undertone and surface reflection. Natural-looking black reflects light the way your hair already does: it has variation in shine as hair moves, and it doesn’t look like a single reflective sheet. Movement helps. Soft bends and brushed waves break reflections into multiple points, making the hair look more like real hair fibers and less like a uniform surface. If your extensions look “flat” outside, the fix is typically finish, texture match, and styling cohesion—not simply buying a darker or lighter black.
How to match undertones without overthinking it
Check your hair in indirect daylight, not just bathroom lighting. Warm-reflective hair often blends best with softer neutral blacks; cool-reflective hair can carry cooler blacks and jet black more convincingly. Match undertone first, then choose depth, so your hair looks consistent across different rooms and times of day. If you’re between shades, prioritize texture match and end shaping—those two factors often make a near-match look seamless.
How many pieces or wefts do you actually need for a believable blend
The right amount depends on haircut shape and baseline density. Blunt cuts often need stronger end support so the perimeter looks consistent; layered cuts may need a gradient of placement so layers merge rather than stopping abruptly. Start with enough coverage to close gaps when hair moves forward and back, then add only what’s necessary. Too much hair increases the chance of visible placement and can make black shades look heavy rather than realistic.
Best option for daily wear vs special occasions
Daily wear favors comfort and repeatability—hair that looks good with minimal effort and doesn’t create tension. Special occasions can support fuller density because styling is more structured and wear time is limited. If you want one approach that covers both, choose a shade story that matches your base for realism, then adjust “drama” through styling and placement rather than relying on maximum weight or length.
Shade, undertone, and finish selection (black, jet black, balayage, and contrast blends)
Black-based extensions are not one-note. There’s classic black for seamless blending, jet black for crisp polish, ash-black balayage for softened dimension, and contrast blends that add brightness or cool tone while remaining wearable. Your best choice depends on how your hair reflects light, whether you prefer minimalism or statement contrast, and how much styling you want to do.
Classic black: the most invisible upgrade when you want “better hair,” not “different hair”
Classic black is the natural starting point for most shoppers because it aims for seamless blending. It’s often the easiest route to believable fullness, especially if you want hair that looks like you simply have more of it. If you want a controlled path into core shades and lengths, begin with black clip-in hair extensions for flexible, natural-looking daily wear when you want removable ease, or move into longer-wear methods later if your routine supports them.
Jet black: when crisp polish and contrast are the point
Jet black is most convincing when treated as an intentional aesthetic. It pairs well with sleek styling, clean parting, and controlled shine because uniform depth looks best when the silhouette is controlled. If that’s your goal, explore jet black hair extensions for sleek, high-contrast styling and plan for polished finishes rather than fluffy ones.
Ash-black balayage: dimension that reads expensive without loud contrast
Ash-black balayage introduces subtle variation that mimics natural light play, making dark hair feel less flat. It’s a strong option if solid black tends to look severe on you or if you want depth that photographs well without heavy styling. If you prefer nuanced dimension, browse ash black balayage hair extensions for soft, elevated depth and choose a texture that supports the blend pattern.
Black and silver blends: modern cool contrast with a controlled transition
Silver contrast can look striking, but abrupt transitions can read costume-like unless styling is intentionally editorial. A blend creates a transition zone that often looks more believable in motion and across mixed lighting. If you want cool-toned dimension with control, consider black and silver hair extensions for wearable, modern contrast and rely on movement (bends, waves) to visually mix tones.
Black and blonde blends: brightness without committing to bleach
Black-to-blonde blends can brighten your overall look without bleaching your natural hair, especially when placed for face framing or lift through mid-lengths and ends. The key is cohesion: placement should support your haircut shape, and texture should help tones mix rather than separating into blocks. For a contrast pathway that stays intentional, explore black and blonde hair extensions for high-contrast dimension that stays wearable and keep the silhouette clean.
Texture and blend strategy (so it disappears into your real hair)
Texture is the fastest route to realism. If texture matches, shade becomes easier to blend; if texture clashes, even a close shade match can look obvious at the ends and sides. Start by matching how your natural hair behaves at the perimeter—straight, softly waved, or wavy—then place pieces to support your haircut shape so the silhouette reads cohesive from every angle.
How to blend with blunt haircuts (no shelf, no “thick ends” giveaway)
Blunt cuts emphasize the perimeter, so the ends must look consistently dense. Choose enough end support to avoid a see-through baseline, then trim extensions to mirror your hemline rather than letting them taper thin. If you want a crisp finish, keep the perimeter structured; if you want softer realism, add a slight bevel at the ends so the line looks natural without losing the blunt shape.
How to blend with layered haircuts (so layers don’t stop abruptly)
Layers require a gradient. Place shorter pieces higher and longer pieces lower so your natural layers merge into the added hair rather than stopping abruptly. If you still see a transition, shaping the extensions often solves it faster than adding more hair. In darker shades, a cohesive silhouette can matter more than micro-perfect shade matching because the eye reads shape first.
How to blend with short hair (overlap and movement are everything)
Short hair blending depends on overlap: your natural hair must be long enough to cover attachment points and merge into the added hair. Soft movement helps hide transition lines better than pin-straight styling when your natural hair is shorter. For a practical mindset and placement guidance, read why extensions can be transformative for short hair without looking obvious and choose a believable length increase you can integrate.
How to blend with medium-length hair (fix thin ends without looking “too perfect”)
Medium hair often has thinner ends, which can make dense extensions look overly perfect. Create realism by building density gradually rather than stacking heavy hair at the bottom. Trim to match your current shape, and add soft bends through the mid-lengths so transitions feel seamless. If your natural hair loosens through the day, a lightly wavy texture can stay believable longer than ultra-straight styling.
What to do if it looks obvious around the sides (the fastest fixes)
Side visibility usually comes from placement too close to the hairline or insufficient coverage above the ear. Move pieces slightly back and add a lighter layer higher to camouflage. Match direction: if your hair naturally sweeps forward, style the extensions to follow that movement. If the sides look “separate,” it’s often a placement problem first, a texture mismatch second, and a shade mismatch third.
Why wavy texture can outperform straight hair for blending (especially in black)
Waves blur density differences and visually mix tones, which helps solid black and contrast blends look natural. If you frequently wear movement, choose a wavy pathway so the extensions behave like your natural hair across the day. For method-first shopping, browse black wave clip-in hair extensions for effortless blending and movement and aim for brushed, modern waves rather than tight curls.
Method-by-method comparison (clip-in vs tape-in vs micro ring)
Choosing the right method is less about “best” and more about “best for your wear frequency, comfort, and maintenance habits.” A method that doesn’t match your routine will either sit unused or become a daily frustration. Below is a practical comparison to help you choose with your schedule in mind.
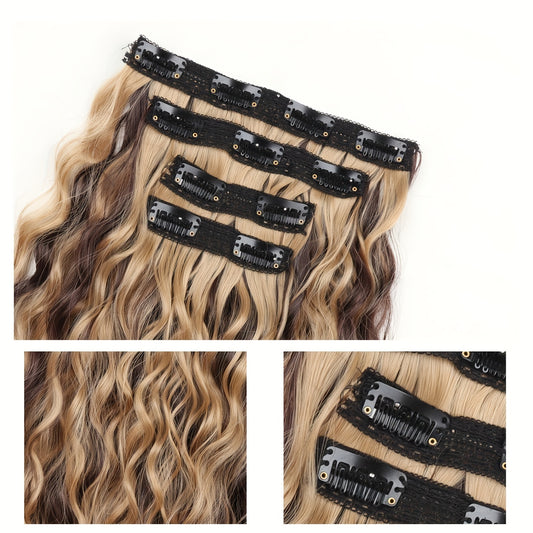
Clip-ins: the best choice when you want control, flexibility, and low commitment
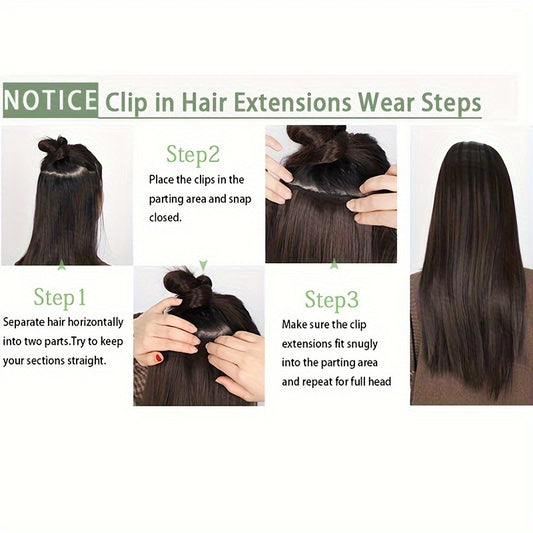
Clip-ins work well when you want to wear extensions selectively: weekends, events, travel, or specific workdays. Their biggest advantage is control—you decide where density goes, you can remove them at night, and you can adjust placement as your haircut grows out. Clip-ins also allow you to “learn your hair” without committing, which is why they’re often ideal for first-timers or anyone sensitive to tension.
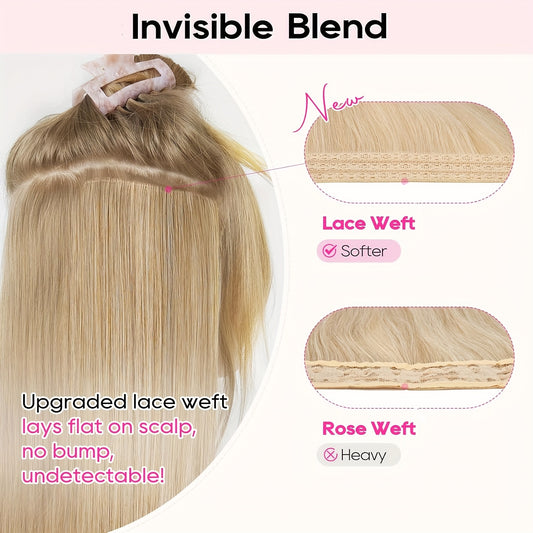
The trade-off is that clip-ins require consistent placement technique for invisibility. You need to distribute weight, avoid stacking too high, and ensure your natural hair covers the top weft line. If you want a detailed learning resource to reduce trial and error, use a seamless blending guide for black clip-in hair extensions as your troubleshooting reference when the sides or ends look off.
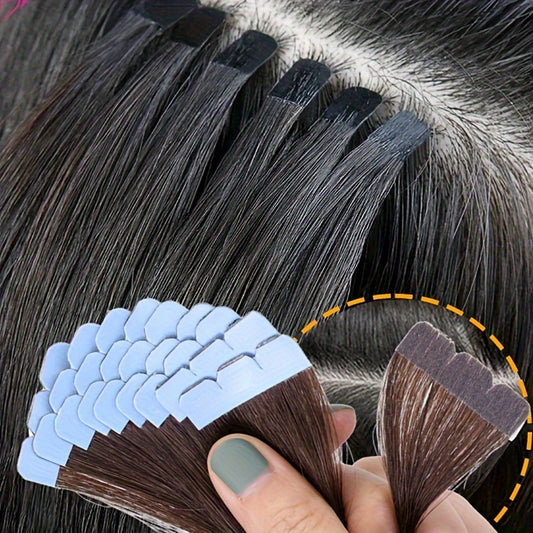
Tape-ins: the best choice when you want consistent everyday hair without daily installation
Tape-ins suit shoppers who want a consistent look across weeks with less daily effort. When installed well, they can look extremely natural because they lie flat and distribute hair evenly. Tape-ins are often chosen by people who want “wake up and go” hair that still looks finished.
The trade-off is maintenance discipline. Tape-ins reward careful washing, mindful product use, and routine detangling. If you like oily products near roots, or you prefer highly textured styling products that build up, tape-ins may feel demanding. If your routine supports structured upkeep, explore black tape-in hair extensions for longer-wear volume and coverage and plan care habits before committing.
Micro rings: the best choice when you want longer-wear fullness and you’re consistent with care
Micro rings can fit shoppers who want longer-wear placement and are comfortable with structured maintenance. People often like them because they can deliver continuous fullness without daily installation. They can be a strong option for those who want a consistent silhouette and are willing to maintain it thoughtfully.
The trade-off is that micro rings reward routine: gentle detangling, careful product use, and attention to tangling at the outer layer. If you’re prone to skipping maintenance, any longer-wear method can become uncomfortable. If you’re considering this route, browse black micro ring hair extensions for longer-wear styling routines and choose density you can wear comfortably.
Density planning by haircut type (how to get realism without bulk)
Density is where many black extension looks succeed or fail. Black hair reads dense visually, so “more hair” can quickly look heavy if it’s not distributed correctly. Density planning is about building a believable silhouette: fuller where hair naturally looks fuller, lighter where real hair needs to conceal placement.
For blunt cuts: perimeter support first, then minimal crown coverage
With blunt cuts, the perimeter is the story. Your density plan should prioritize the bottom third of your hair so the ends don’t look see-through. The crown should stay lighter so your natural hair can cover weft lines. If blunt ends look too thick compared to your natural hair, trimming and subtle point shaping can make the perimeter read more natural while preserving the blunt vibe.
For layered cuts: build a gradient so the layers merge
Layered hair needs a gradual density increase, not a sudden jump at the bottom. Place a lighter layer higher up and fuller coverage lower down so your natural layers blend into the added hair. If your natural layers are short around the crown, avoid placing thick wefts too high; that’s where bulk becomes visible fastest.
For fine hair: fewer pieces placed precisely usually looks more expensive
Fine hair can look incredible with extensions when the upgrade is subtle. Use fewer pieces, avoid heavy stacking, and prioritize texture match. The goal is a refined “better perimeter,” not a dramatic density shift. If you see a visible step at the ends, the fix is almost always a gradient and end shaping, not more hair.
For thick hair: match density so your natural hair doesn’t overpower the set
Thick hair can swallow light-density extensions, making the added hair look like a thinner layer underneath. If you have thick hair, you may need more coverage so the added hair contributes meaningfully to the silhouette. Texture match is still essential—if your hair is naturally wavy and the extension is straight, the mismatch will show even if the shade is perfect.
Shade and finish troubleshooting (common problems, clear fixes)
Most extension issues are solvable without replacing your entire set. The goal is to identify what’s actually wrong—shade, undertone, texture, placement, or finish—so you can fix the problem efficiently.
Problem: black looks too flat or “ink-like” in photos
This is usually a finish issue. Add movement through brushed bends or waves so light reflects in multiple points. Avoid heavy coating products that create a glossy film. If your look is meant to be sleek, keep roots smooth and add only a subtle bend at the ends so the hair still has natural light play.
Problem: black looks like a separate layer near the face
This is often undertone mismatch or placement too close to the hairline. Move placement slightly back, ensure coverage above the ear, and style your natural hair and extension hair together. If your hair throws warm reflections, a cooler black can look separate unless you style intentionally and keep the silhouette very polished.
Problem: ends look too thick compared to your natural ends
This is a classic density transition issue. Create a gradient by adding lighter coverage higher and trimming the extensions to match your haircut shape. In black shades, end shaping matters more than you expect because the eye notices the perimeter first.
Problem: contrast blend looks “stripy” instead of dimensional
Contrast looks best when tones mix visually. Add movement—waves, bends, or brushed texture—so the colors interact rather than sitting in blocks. Also consider placement: higher contrast is usually more believable when concentrated mid-length to ends, with the root zone kept cohesive for realism.
Styling ideas (daily + event)
Great extension styling doesn’t look like effort; it looks like intention. The most convincing looks are repeatable, resilient in motion, and consistent at the sides. Build two signature looks—one for daily life, one for events—so you’re not reinventing your routine each time you wear extensions.
Quick looks for daily polish
- Low ponytail with a wrapped base for thickness that reads natural
- Half-up twist to lift the crown while keeping sides covered
- Soft side part with brushed bends to blur transitions at the ends
- Low bun with a fuller perimeter for a clean, elegant profile
Photo-ready looks for events
- Sleek straight lengths with a clean middle part for a refined silhouette
- Brushed-out waves to diffuse join lines and add dimension
- High ponytail with controlled volume and smooth sides
- Romantic half-up styles that show length without exposing attachment points
Prom and formal styling for medium-length hair
Medium hair is a sweet spot for extensions because overlap improves blending and the finished style looks balanced. Choose a silhouette with structure—waves, half-up styling, or a polished ponytail—and use extensions to strengthen the shape where your hair is thinner. For inspiration you can adapt without overcomplicating, explore prom hairstyles for medium-length hair that pair well with extensions and pick one style you can execute comfortably.
Sleek jet black styling that feels timeless, not severe
Jet black looks best when the silhouette is controlled: smooth roots, intentional shine, and clean ends. A subtle bend at the perimeter can soften the look while staying polished. For wearable references, use straight jet black styling ideas for a timeless sleek finish and build a repeatable look rather than chasing constant variation.
Volume-building that doesn’t create crown bulk
Natural volume is distributed. Build fullness through mid-lengths and ends and keep the crown lighter so your natural hair can cover attachment points. Style your natural hair and extension hair together so texture reads consistent. For technique-driven guidance that reduces trial and error, follow clip-in volume techniques that look natural without a heavy top and adopt only the steps you’ll actually repeat.
Accessory styling that keeps extensions discreet at the sides
Accessories elevate a look when they are placed thoughtfully: anchor clips and wraps in your natural hair rather than directly on wefts, and avoid overly tight elastics that increase tension. For an accessory-forward option that can still look natural, adapt bandana hairstyle ideas that keep extensions discreet at the sides while maintaining a believable hairline.
Short, chic styling guidance when you don’t want dramatic length
Not every extension upgrade needs to be long. Shorter lengths can look exceptionally believable for daily life because they preserve your identity while improving density and silhouette. If you’re aiming for a short, polished result that still feels elevated, reference 12-inch clip-in hair extension styles for a short, chic finish and choose one shape you can repeat easily.
Care, maintenance, and longevity (what actually extends lifespan)
Extensions stay premium-looking when maintenance is consistent and realistic. The biggest threats to longevity are friction, product buildup, aggressive detangling, and repeated high heat. Dark shades can show dryness as dull ends; contrast blends can show tangling at the outer layer where friction is highest. The goal is clean movement and a finish that stays believable across lighting.
Washing frequency that preserves softness
Wash based on buildup, not calendar days. Occasional wear typically requires fewer washes, which helps preserve softness and movement. If you use styling products heavily, wash sooner, but avoid overwashing, which can increase dryness and make hair look less natural. Clean extension hair should feel light and movable, not coated.
Detangling rules that prevent frizz and shedding over time
Detangle gently from ends upward while supporting the base to avoid tension. Avoid rushing through tangles, especially when hair is dry. Most frizz comes from mechanical damage, not from the hair itself. Calm handling preserves finish and keeps movement natural, which is particularly important in black shades where roughness can read as dullness.
Heat boundaries that protect realism
Use the lowest effective heat and avoid constant restyling. Repeated high heat can change how hair reflects light, making black look flat and contrast blends look less cohesive. Choose a signature finish and maintain it rather than reworking daily. If your routine depends on heat, prioritize a texture that holds style longer to reduce repeated passes.
Comparing nearby categories (wear frequency, length goals, and contrast appetite)
Choosing extensions becomes simpler when you compare by what each option solves. Clip-ins solve flexibility and fast transformation. Longer-wear methods solve continuity. Shorter lengths solve believability and ease. Contrast blends solve “new look” energy without permanent dye. Below is a practical way to decide based on how you live.
If you wear extensions 1–2 times per week
This wear frequency often favors removable options because you don’t want a daily maintenance obligation. You can create event hair, upgrade a weekend look, or enhance photos without committing to continuous wear. In this frequency range, placement skill is your biggest lever—learn where your hair hides weft lines best, and keep density focused on mid-lengths and ends for realism.
If you wear extensions 3–5 times per week
At this frequency, convenience becomes as important as flexibility. Many people still choose clip-ins, but they streamline their routine by choosing one signature placement map and one repeatable style. If you want longer-wear continuity, consider whether your product habits and washing routine suit that method; the best choice is the one you can maintain without resentment.
If you want maximum realism for daily life
Prioritize your natural base shade or an ash-softened dimension, match texture to your ends, and choose a length increase that feels plausible for your haircut. Subtle upgrades often earn the most compliments because they look like health and fullness rather than an obvious change.
If you want intentional contrast that still looks polished
Contrast works best when it’s controlled: cohesive root zone, transition through mid-lengths, and movement that mixes tones. If you want a deeper concept guide to balancing light and dark so it reads intentional, use a contrast framework for mixing dark and light extension tones and apply the logic to black-blonde or black-silver styling.
Featured picks and use-case recommendations (practical, not pushy)
These recommendations are organized by real needs: beginner-friendly placement, polished straight silhouettes, forgiving wave texture, face-framing changes, deeper dark contrast, and longer-wear routines. Use them as starting points, then refine with the decision framework so the outcome fits your hair type and schedule.
Beginner-friendly everyday fullness
Best for controlled placement and removable comfort
If you want a straightforward entry point that lets you control placement and density, consider black human hair clip-on extensions for natural fullness and control and build coverage gradually rather than aiming for maximum volume immediately.
Polished straight silhouettes
Best for sleek looks that blend cleanly
Straight styling is unforgiving, which makes end shaping and texture consistency essential. For a clean silhouette, explore straight black clip-in extensions for a sleek polished finish and trim the ends to mirror your haircut shape so the perimeter reads cohesive.
Forgiving wave texture for easy blending
Best for movement that disguises transitions
Soft wave texture can make blending easier because it visually mixes densities and reduces the sharpness of transition lines. If you want a texture that stays flattering as hair moves, consider wavy black hair extensions for soft movement and easy blending and brush out the wave for a modern, lived-in finish.
Face framing without cutting
Best for testing side bangs and reshaping your look
Fringe can change your whole silhouette without a haircut commitment. If you want a reversible face-framing option, choose black side bangs hair extensions for instant face-framing change and style them to match your part so they look integrated.
Deeper contrast for bold depth
Best for a richer dark tone that reads intentional
If your goal is a deeper, bolder dark tone, keep the silhouette controlled so the result reads polished rather than heavy. A strong option is dark black clip-on extensions for deeper contrast and bold silhouettes, especially when paired with clean ends and intentional shine.
Longer-wear routines
Best for longer-wear jet black placement
If you prefer a longer-wear approach and want jet black as a deliberate aesthetic, consider jet black human hair micro ring extensions for longer-wear sleek styling and commit to consistent detangling and maintenance to preserve the finish.
Buying guidance and common mistakes to avoid
Shopping becomes simpler when you buy like a stylist: start with your constraints, then choose shade story, then choose method. Most disappointment comes from choosing by one photo rather than thinking through undertone, texture, density distribution, and upkeep tolerance. These are the mistakes that most often make black extensions look less natural—and the fixes that protect realism and comfort.
Mistake: choosing black under indoor lighting and calling it a match
Indoor lighting can hide undertone differences and exaggerate shine. Always check your hair in indirect daylight, then choose a shade story that matches how your hair reflects light. If you skip this step, the hair can look right in one room and wrong everywhere else. Undertone alignment is the fastest route to a seamless result.
Mistake: buying maximum length before planning your haircut silhouette
Length should support shape. If you increase length dramatically without shaping, the result can look like two haircuts. Decide the silhouette you want—blunt, softly layered, U-shape, or tapered ends—then trim extension ends to match so the perimeter reads cohesive. With dark shades, silhouette cohesion often matters more than micro-perfect shade matching.
Mistake: adding too much hair at the crown and creating bulk
Crown bulk is a common giveaway. Keep the top lighter and build fullness through mid-lengths and ends. If you feel heaviness or see a bump, remove one piece near the crown and redistribute lower. Comfort and realism usually improve together when weight is placed well.
Mistake: dyeing your hair black impulsively to match extensions
Black dye is a commitment and can shift undertone in ways that complicate matching. Before changing your base, think through root maintenance, how the color will age as your hair grows, and whether your features and wardrobe support the contrast. For a careful checklist, read what to consider before dyeing your hair black and decide whether matching extensions to your current hair is the safer move.
Mistake: ignoring the long-term pros and cons of going black
Going black can be timeless, but it can also increase upkeep depending on your natural color and growth rate. Consider how you feel about visible regrowth and maintenance cadence. If you’re still deciding, use realistic pros and cons of dyeing hair black for long-term upkeep to make a thoughtful choice.
FAQ (8–12 Q&As, transactional but not pushy)
Which black shade looks most natural if my hair has warm reflections?
If your hair shows warm brown or auburn reflections in daylight, a softer neutral black typically blends more naturally than a very cool jet black. Match undertone first, then adjust depth. Movement helps keep reflections realistic, especially in black shades that otherwise look uniform.
How do I choose between solid black and dimensional black (balayage or blends)?
Choose solid black if your goal is seamless realism and a clean silhouette. Choose dimension if solid black tends to look flat on you or if you want depth variation that photographs well without heavy styling. Dimensional options can also make blending easier because they introduce natural-looking variation.
Are clip-ins or tape-ins better for beginners?
Clip-ins are usually easier because you can adjust placement and remove them at night. Tape-ins can look extremely natural, but they require a longer-wear commitment and consistent maintenance. If you’re still learning your ideal length and density, clip-ins are often the better starting point.
How can I make extensions look natural at the sides near my face?
Keep placement slightly back from the hairline and ensure coverage above the ear so movement doesn’t expose attachment points. Match the direction of your natural hair growth and style your natural hair and extensions together. If sides still look obvious, placement is usually the fix, not more hair.
What’s the best way to avoid a visible line at the ends?
Create a gradient with strategic placement, match texture to your natural ends, and trim extensions to mirror your haircut shape. Soft bends or brushed waves can blur transitions quickly. In many cases, shaping improves realism more than adding additional pieces.
Can short hair wear extensions without looking obvious?
Yes, if you choose a believable length increase and prioritize overlap and texture. Soft movement helps hide transition lines better than pin-straight styling on short cuts. Trimming to match your haircut shape is often essential for a natural perimeter.
How do I decide if I should dye my hair black to match extensions?
Consider upkeep first: root grow-out, undertone shifts, and maintenance cadence. Extensions can be a safer way to test a darker look without permanent commitment. If you do dye, plan a shade story that stays cohesive with your brows and wardrobe palette.
Which styles photograph best with black extensions?
Brushed waves and controlled bends photograph well because they diffuse join lines and create realistic reflection points. Sleek straight looks can also be stunning, but they demand precise blending and end shaping. Choose a style that stays intact in motion and doesn’t expose sides.
How many pieces should I use for a natural daily look?
Use the minimum that closes gaps and supports your perimeter. Daily realism often improves when you place fewer pieces strategically rather than stacking heavy density. Start with end support and add only if you see thin spots when your hair moves.
Are contrast blends like black-to-blonde harder to maintain than solid black?
They can be because the look depends on cohesion between tones, which benefits from controlled styling and consistent detangling. Movement helps keep blends intentional across lighting. Avoid heavy buildup so the hair stays light and the blend reads natural.
Browse the Collection
Black hair extensions look premium when they’re chosen as a system: undertone, texture, method, and weight distribution aligned with your real routine. Whether you want seamless everyday density, crisp jet black polish, softened balayage dimension, or a contrast blend that still reads believable, the best result is the one you can repeat comfortably and maintain consistently. Use the framework above to narrow quickly, choose a method that fits your schedule, and prioritize natural movement and end shaping for a finish that holds up in daylight and photos. Internal linking placeholder: Add a CTA link here to “Browse the Black Hair Extensions Collection” above the product grid.