
-

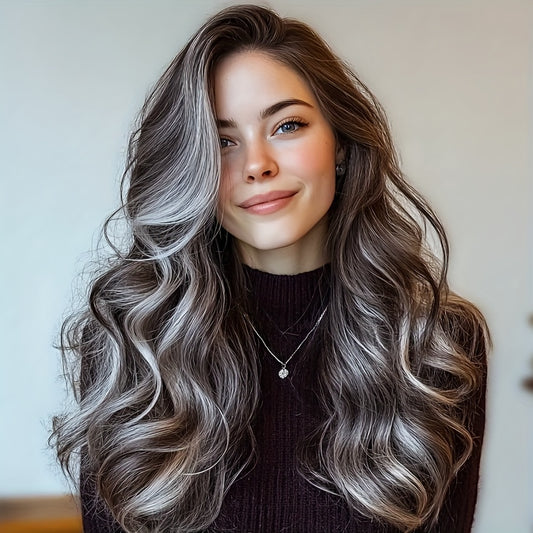
24-Inch Wavy Balayage Wig Featuring an Ash Brown to Grey Ombre, Made from Heat-Friendly Fibers, with an Adjustable Rose Net Cap, Offering a Appearance Suitable for All Ethnic Backgrounds, Perfect for Parties And Festivals
Regular price $218.80 USDRegular priceUnit price per$0.00 USDSale price $218.80 USD -


Long Straight Hair Extensions in a Seven-Piece Set, Suitable for Women, Featuring European And American Styles with 16 Clips for a Curtain Effect
Regular price $210.28 USDRegular priceUnit price per$0.00 USDSale price $210.28 USD -

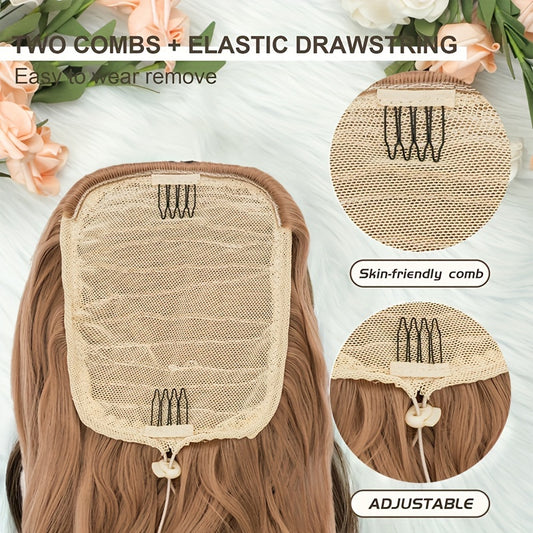
Long Curly Wavy Hair Piece Synthetic Pony Tail Extensions For Women Highlight Balayage
Regular price From $211.60 USDRegular priceUnit price per$0.00 USDSale price From $211.60 USD -

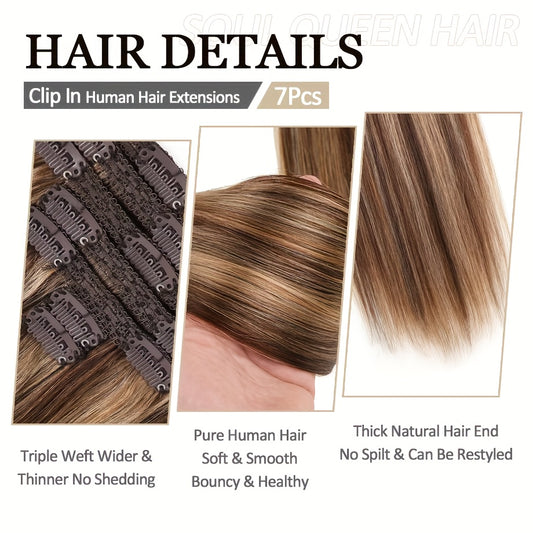
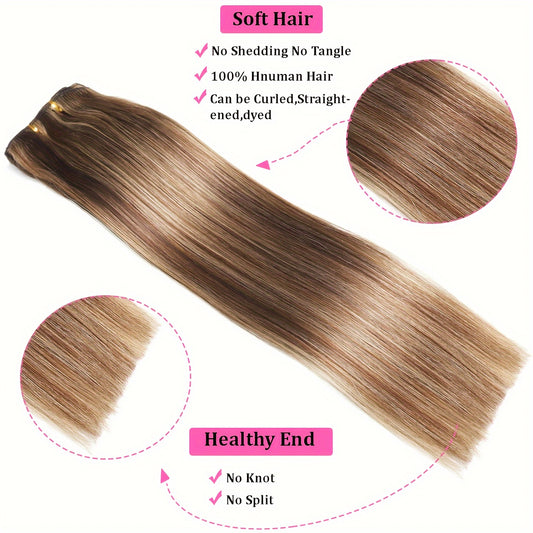
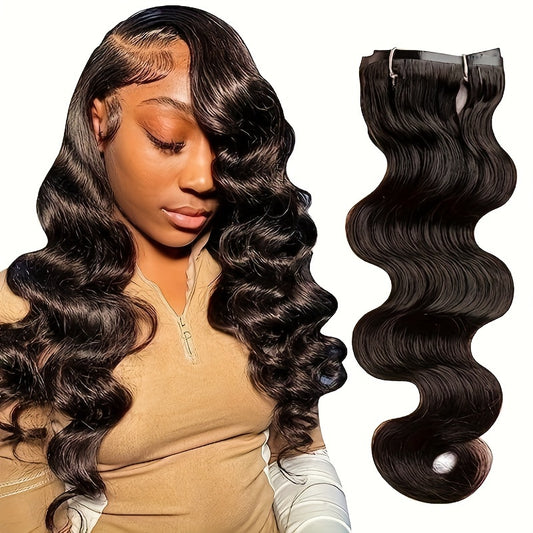
24-Inch Clip-In Hair Extensions, Real Human Hair Double Weft, 100% Remy Design for Women
Regular price $249.00 USDSale price $249.00 USDUnit price per -

Clip In Hair Extensions Real Human Hair | 18-26 Inch 120 G 8pcs Seamless Clip In Hair Extensions
Regular price $246.36 USDRegular priceUnit price per$46.36 USDSale price $246.36 USD -

8pcs/1 Set with 18 Clips Body Wave Human Hair Clip In Extensions 120g
Regular price $259.00 USDSale price $259.00 USDUnit price per -

Clip In Hair Extensions Real Human Hair | Remy Human Hair Extensions Clip Ins For Women
Regular price $229.00 USDSale price $229.00 USDUnit price per -


24 Inch Clip In Long Straight Synthetic Hair Extension | 6PCS Balayage Pale Golden Honey Thick Hairpieces
Regular price $109.99 USDSale price $109.99 USDUnit price per -

4pcs Thick Clip In Long Wavy Synthetic Hair Extensions
Regular price From $114.84 USDRegular priceUnit price per$14.84 USDSale price From $114.84 USD -

Real Human Hair Body Wave Human Hair Clip In Extensions
Regular price $239.00 USDSale price $239.00 USDUnit price per -
6pcs Synthetic Clip In 24 Inch Long Curly Wavy Hair Extensions
Regular price $110.00 USDSale price $110.00 USDUnit price per -

4pcs Clip-In Synthetic Hair Extensions | Long Wavy Thick Double Weft Hairpieces
Regular price From $111.23 USDRegular priceUnit price per$11.23 USDSale price From $111.23 USD


24 Inch Clip In Hair Extensions: The Editorial Guide to Ultra-Long Length That Still Looks Real
24 inch clip in hair extensions are for people who want the kind of length that changes the entire silhouette—waist-grazing movement, fuller ponytails, more dramatic waves—without making the choice permanent. Done well, 24 inches doesn’t look like “added hair.” It looks like your own hair, only longer, thicker, and more camera-ready. The challenge is that ultra-long length is less forgiving than mid-length options: undertone mismatches show faster, texture differences read more clearly, and weight distribution matters more for comfort. This guide is built to help you shop with clarity and wear 24-inch clip-ins with confidence, starting with the complete 24-inch clip-in extensions collection.
What this collection is and who it’s for
This collection focuses on clip-in extensions that sit at an ultra-long 24-inch length. Clip-ins are designed to be removable—installed in minutes, removed at night, and worn on your schedule. At 24 inches, most people see the hair fall around the lower mid-back to waist area depending on height and torso length. That makes it a true “statement length,” but one that can still be worn day-to-day when you choose the right coverage and blend strategy.
24-inch clip-ins are a strong match for:
- People who want a noticeable transformation for events, travel, content days, or seasonal style changes.
- Medium-to-thick hair types who want long length without thinning at the ends.
- Anyone who enjoys styling—waves, braids, half-up looks, ponytails—because longer hair gives more space for shape.
- Shoppers who like flexibility: long hair when you want it, natural hair when you don’t.
Who gets the most natural results with ultra-long clip-ins
The most believable results usually come from matching undertone and texture first, then choosing coverage that supports your natural density. If your hair is shoulder-length or longer, 24 inches can blend surprisingly well with soft waves. If your hair is short, blunt, or very fine, you can still wear 24 inches beautifully—but you’ll want to rely on styling to break up the transition line and avoid installing “maximum pieces” just to chase fullness.
What 24 inches feels like in daily life
Ultra-long hair changes how you move through the day: it brushes coats and scarves, catches on handbag straps, and tangles faster when it rubs against textured fabrics. The good news is that small habits—gentle brushing, low-friction storage, and controlled styles on busy days—make the length feel luxe rather than fussy.
Why this category matters now (freshness, trends, real-life use)
Long hair has shifted from being purely “glam” to being a practical styling tool—something you can wear for a weekend, a shoot, a wedding, or a confidence reset, then take off when you want simplicity again. Clip-ins fit that reality because they’re temporary and customizable: you can change the amount of hair you wear, adjust placement, and rotate styles without committing to long-term methods.
24 inches is especially relevant because it creates maximum visual impact with minimal time. In photos, this length reads instantly. In real life, it can still look natural when the blend is thoughtful—meaning the hair looks like it belongs to your head in daylight, not just in indoor lighting.
Why 24 inches reads “luxurious” instead of “overdone”
Luxury at this length comes from restraint: cohesive undertone, a texture that matches how you actually wear your hair, and ends that look full without looking heavy. If you love the idea of long hair but want it to look refined, a length-focused explainer like what makes 24-inch hair look long and truly luxurious can help you identify the details that separate premium from obvious.
How to make ultra-long hair feel modern, not costume-like
The most current approach is movement over perfection: soft waves, brushed curls, natural dimension, and a blend that looks believable in daylight. When ultra-long hair looks dated, it’s usually because it’s too uniform—one flat color, one stiff texture, one overly precise finish. A more editorial result comes from softness and a “real hair” gradient rather than a single solid block of tone.
How to choose the right option (Decision Framework)
Decision Framework
Use this quick method to shop 24 inches without guesswork:
- Goal → length, volume, or a full transformation
- Shade/undertone → match tone direction in daylight
- Texture/finish → straight, wavy, or curly realism
- Construction/type → weft design, clip layout, set size
- Weight/coverage → enough density to support your ends
- Occasion/frequency → daily wear vs event rotation
- Care tolerance → how much maintenance you’ll realistically do
- Budget/value → cost-per-wear and comfort priorities
How to choose 24-inch clip-ins for thin hair right now
For fine hair, the goal is a believable transition—not maximum thickness. Choose coverage that fills your ends without overloading your roots, and place wefts slightly higher than you might at shorter lengths so your natural hair can drape over the top. Finish with soft bends or waves so your natural ends visually merge into the extension length.
How to choose 24 inches for thick hair without a “top heavy” outline
Thick hair needs end density to match. If your natural hair is dense through the mid-lengths, avoid extensions that taper too quickly at the bottom, or you’ll get a shape that looks heavier on top and thinner below. The easiest fix is to style for cohesion: waves unify density and make the entire silhouette read as one.
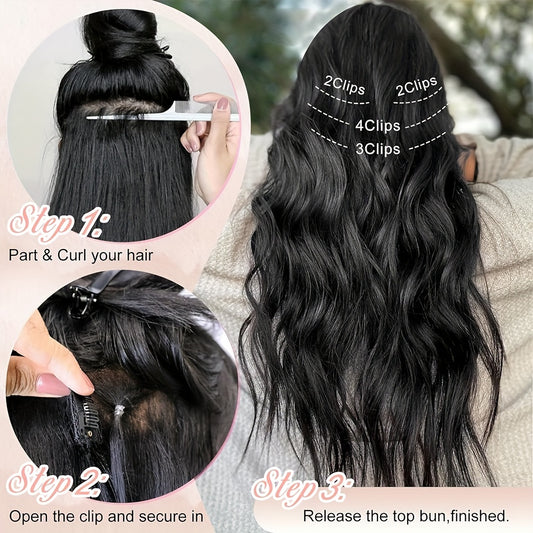
How many pieces do you actually need for a full look
Think in zones. Most people get the best result by building a strong lower-back foundation for length continuity, then adding mid-zone fullness, then using side pieces only if face-framing density is needed. Wearing too many pieces can backfire: it can feel heavy, make clips more detectable, and create bulk that looks less natural than a balanced install.
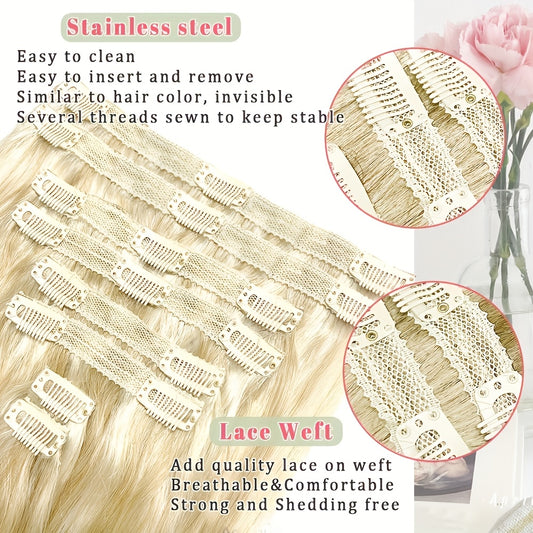
What to prioritize if comfort is your deal-breaker
At 24 inches, weight distribution matters. If you’re debating between different weft builds, it helps to understand how thickness influences feel and coverage. A practical comparison like whether single-weft or double-weft clip-ins are better for your goals can clarify what’s likely to sit flatter and feel more secure.
Best option for daily wear versus special occasions
For daily wear, choose manageable coverage and a texture that matches your natural pattern so you’re not heat-styling just to blend. For events, you can go fuller and more styled because the look is meant to be intentional and photo-forward, and you’ll likely wear controlled styles that keep the length polished.
Shade, undertone, and finish selection
Ultra-long hair amplifies color differences. A slight undertone mismatch can look minor at 16 inches and obvious at 24 inches because there’s more visible surface area reflecting light. The key is to match undertone direction first (warm, cool, neutral), then align your “finish story” (natural dimension, softness, shine level) so the hair looks like it belongs together.
How to match undertones without overthinking it
Check your hair in indirect daylight and identify the cast: warm (golden, honey, copper), cool (ash, smoky), or neutral (balanced). Then choose extensions that lean the same direction. If you’re between, neutral tones tend to blend more easily, especially when you style with soft waves that break up strict color lines.
What 24-inch extensions look most natural in daylight
The most believable results often happen when the extension color matches your mid-lengths and ends rather than your roots. That keeps the length cohesive and lets your natural root depth do the work of realism at the top. In daylight, this approach reads like grown-out hair rather than a sudden color switch.
How to blend black and deep shades without a harsh line
Deep shades can look incredibly polished at 24 inches, but undertone matters more than most people expect. A warm black against a cool black can read mismatched in sunlight. If you’re working with very dark hair, use a seamless blending guide for black clip-in extensions to avoid the most common “almost but not quite” mistakes.
When balayage is the easiest shortcut to realism
If your hair has highlights, lived-in color, or natural dimension, multi-tonal extensions can blend more naturally than a single flat shade. This is especially helpful at 24 inches because dimension disguises transitions. For a softer gradient look, explore balayage clip-ins designed for natural-looking dimension.
Texture and blend strategy
Texture is the difference between “this is her hair” and “those are extensions.” Even a perfect color match can look obvious if your natural hair has wave and the extensions are pin-straight—or if your curls behave differently throughout the day. The goal is to choose a texture that mirrors your real hair pattern, then style lightly to unify the finish.
How to blend with blunt haircuts
Blunt cuts create a strong edge, so the transition into long hair needs softness. Add a bend or wave starting above your natural ends, then brush lightly to merge. If you insist on wearing hair straight, a subtle inward curve at the ends often looks more realistic than perfectly flat hair.
How to blend with layered haircuts
Layers are extension-friendly because movement is already built in. Place your wefts so the extension hair supports the lower layers, then let your top layers sit freely over the surface. A quick wave through the mid-lengths usually makes everything look like one haircut.
How to blend with short hair without a visible shelf
Short hair can wear 24 inches, but it needs texture to hide the jump. Curl your natural hair and extensions together, then soften with fingers to break up uniformity. If you want a mindset reset that makes the process feel doable, why extensions can be a game-changer for short hair explains the logic that makes the blend believable.
How to blend with medium-length hair for the easiest realism
Medium-length hair often blends most easily because the transition is less extreme than very short hair. Focus on matching texture at the mid-shaft, not just at the ends. When the mid-lengths match, the entire silhouette reads cohesive even if your natural ends are slightly shorter.
What to do if it looks obvious (fast troubleshooting)
If the blend looks obvious, it’s usually one of three issues: placement too low, texture mismatch too strong, or density imbalance between your hair and the extensions. Move the lowest weft slightly higher, add soft waves to unify movement, and ensure your natural ends sit on top of extension hair rather than floating above it.
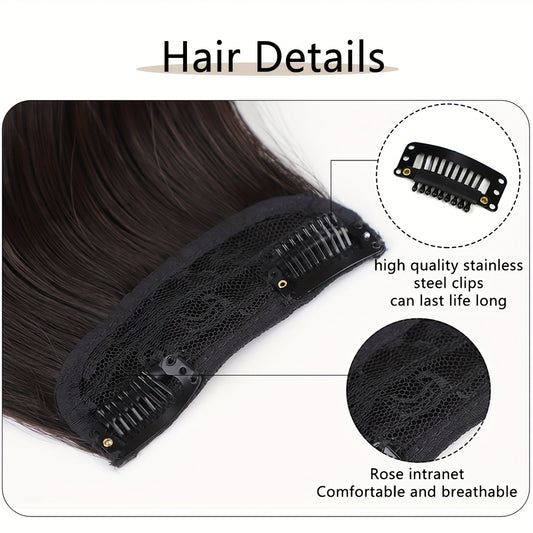
How to build volume without showing clips
Start with a stable base: clean sections, light root grip, and clips placed away from the hairline. Build fullness in the mid-back zone where coverage is naturally easier. If you want technique options that keep comfort in mind, a set of volume-boosting techniques for clip-ins can help you create lift without bulk.
Styling ideas (daily + event)
At 24 inches, styling is about shaping the length so it looks intentional. You don’t need complicated techniques; you need consistent logic—movement that blends, silhouettes that feel modern, and styles that keep ultra-long hair controlled when your day is busy.
Quick looks
- Soft S-waves for everyday blending and a natural finish.
- Low ponytail with a wrapped base for a polished, minimal look.
- Half-up twist to add lift while keeping the length controlled.
- Loose side braid to reduce tangling and make density feel intentional.
Photo-ready looks
- Brushed-out glam waves for fullness that still moves.
- High ponytail with crown lift for a strong, modern outline.
- Half-up with face framing bends for flattering proportions.
- Sleek low bun with length left out in front for editorial balance.
Prom and formal events: styles that hold up for hours
For events, choose structure that keeps hair in place while still showing length—waves, half-up styles, ponytails with lift, or braids with volume. If you want adaptable inspiration, prom hairstyles that translate beautifully with added length can give you shapes that work even when you’re wearing much longer hair.
Bandanas and accessories that make ultra-long hair feel intentional
Accessories can elevate the look and add “style logic,” especially if you’re new to wearing very long hair. For options that feel wearable, not costume-like, explore bandana hairstyle ideas that pair well with long hair.
Celebrity-inspired structure without copying anyone exactly
The most realistic approach is borrowing structure: wave size, part placement, the way the front pieces frame the face. If you like having a reference library for shapes and proportions, a roundup of celebrity hairstyles that stole the show can help you identify silhouettes you can recreate with 24 inches.
Care, maintenance, and longevity
24-inch clip-ins stay beautiful when you treat them like premium accessories. Because clip-ins aren’t attached to your scalp, they typically don’t need frequent washing; the bigger risks are friction, tangling, and heat damage. A simple routine—gentle brushing, light product, mindful storage—keeps the length looking smooth and consistent.
How often to wash 24-inch clip-ins
Wash only when there’s product buildup, heaviness, or dulled movement. Over-washing shortens softness and can increase tangling, especially at longer lengths. Keep conditioning focused on mid-lengths and ends, and avoid heavy products near the clips.
Heat styling rules that protect long ends
Use moderate heat, style in clean sections, and avoid repeated passes. Let the ends catch residual warmth rather than clamping them directly at the highest setting. A gentle finish that lasts is more premium than aggressive heat that sacrifices longevity.
Storage that prevents tangling and preserves shape
Brush before storing, then lay wefts flat or hang them so clips don’t crease the hair. If you travel, keep the hair contained and smooth rather than folded tightly. Friction is the main enemy of long lengths, so your goal is low-friction handling from start to finish.
How to manage ultra-long hair without it feeling high-maintenance
The simplest approach is controlling movement: braid on windy days, ponytail when commuting, waves when you want the blend to disappear. If you want a deeper routine lens, how to manage ultra-long 24-inch extensions day-to-day is a practical guide to keeping length wearable.
Comparing nearby categories (shorter vs longer / adjacent types)
Choosing 24 inches is easier when you understand what sits around it. Different lengths create different “life fits.” Some people love the maximum silhouette; others prefer a long look that feels slightly easier to blend or maintain.
When 22 inches is the wearable alternative
If you want a dramatic look that’s a touch easier for everyday life, 22 inches can be the sweet spot. It still reads “long hair,” but it’s often simpler to blend and maintain. Compare with 22-inch clip-ins for a long finish that stays highly wearable.
When 26 inches is the intentional statement
26 inches is for maximum drama: bolder silhouettes, more editorial looks, and a longer styling “canvas.” It also asks for more controlled styling and careful handling. If that’s your goal, explore 26-inch clip-ins for true statement length and plan your routine accordingly.
Featured picks and use-case recommendations
Shopping gets easier when you choose by use case rather than getting stuck on length alone. Below are curated picks based on finish, texture, and how you plan to wear the hair—everyday polish, event glam, or statement styling.
If you want a premium, seamless finish for the most natural-looking fall
For shoppers prioritizing realism and a refined finish, start with a 24-inch Remy human hair set with seamless design details, which is ideal when you want the length to look smooth, cohesive, and “grown” rather than obviously added.
If you want bold curl texture for high-impact styling
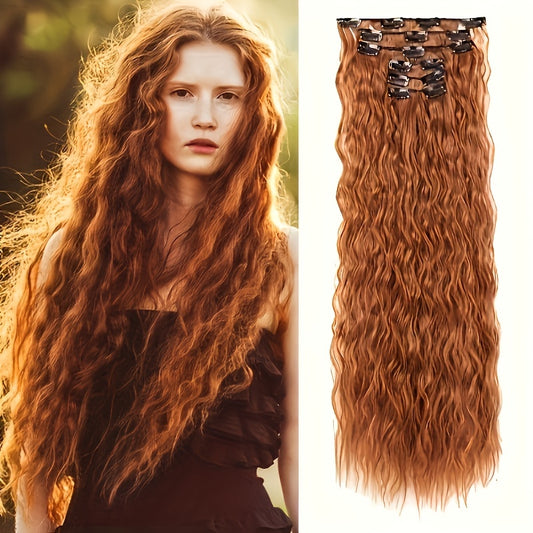
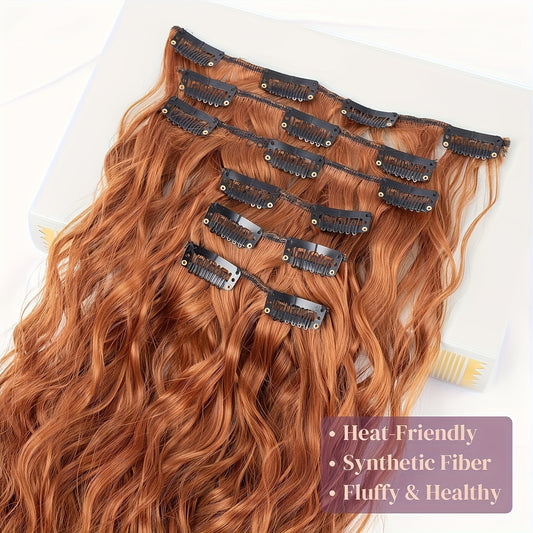
Defined curls can do the blending work for you because texture disguises transition lines and creates intentional volume. Consider a 24-inch curly-wavy synthetic set for statement texture when your goal is a deliberate, photo-forward finish.
If you want sleek straight length with dimensional color
Straight hair shows color and finish clearly, so dimensional tone can keep the look from feeling flat. Try a 24-inch straight synthetic set in balayage pale golden honey tones if you want long, sleek hair with a softer gradient story.
If you want a wearable wave option that blends fast
Waves are forgiving and modern, especially at longer lengths. If you like movement and an easier blend, consider a wavy clip-in set built for natural movement as an everyday-friendly texture reference that photographs well.
If you want a full-head set in a nearby length for rotation
Many people build a small “hair wardrobe”: one ultra-long option for maximum impact and one slightly shorter long option for frequent wear. For a complementary full-coverage choice, look at a 22-inch full-head clip-in set for complete coverage that keeps the long look while feeling a bit easier day-to-day.
If you want a quick single-piece upgrade for fast styling days
Not every day calls for a full install. For quick polish—especially when you want a ponytail that looks instantly styled—use an 8-inch wavy claw-clip ponytail for an instant lift as a simple finishing tool.
Buying guidance and common mistakes to avoid
The biggest mistakes with 24 inches are predictable: shade matching in the wrong light, buying more hair than your head can comfortably support, and expecting a perfect blend with no integration styling. The goal is not perfection; it’s believable hair that feels comfortable and fits your routine.
Mistake: choosing a shade based on indoor lighting only
Indoor lighting can make undertones look closer than they really are. Check your hair and potential shades in indirect daylight, and prioritize undertone direction. If you’re between two shades, matching the mids and ends often looks more natural at 24 inches than matching roots perfectly.
Mistake: chasing maximum density instead of proportional density
More hair isn’t automatically more luxurious. Too much density can feel heavy, create bulk near the clips, and make placement easier to detect. A premium result is proportional: full ends, comfortable wear, and movement that mirrors natural hair.
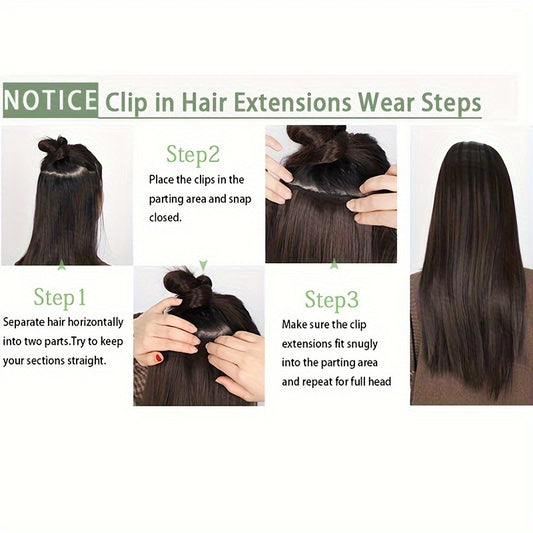
Mistake: skipping the basics that make clip-ins look real
Clip-ins are quick, but they still benefit from a small routine: clean sectioning, stable placement, and a finish that unifies texture. If you want a grounded overview of what matters before you buy, read everything you need to know before buying clip-in hair extensions for decision support that prevents common regrets.
How to get a transformation without overdoing it
The best transformations often come from small, intentional choices: the right undertone, a forgiving texture, and a style that blends the transition point. For a simple explanation of why clip-ins can shift your look so quickly, how clip extensions deliver fast, visible transformation is a helpful reference.
What to do if you want the process to feel easy, not intense
If you’re prone to overthinking, choose a texture that matches your hair and coverage you’ll actually wear. A lighter mindset often produces a more natural result because you stop chasing perfection and start aiming for cohesion. For a low-pressure approach, mastering clip-ins without the drama is a refreshingly practical read.
Why 24 inches is considered maximum impact when done right
At this length, even simple styles look elevated—ponytails swing, waves look fuller, braids read more dramatic. The key is ensuring the length looks intentional rather than heavy. For a length-specific deep dive, why 24 inches is the ultimate length for maximum impact explains what makes the silhouette feel premium.
Related collections
If you’re still deciding, these adjacent collections help you compare outcomes based on your comfort level with length, your blending preferences, and your desired level of daily maintenance.
- Chic short clip-ins for subtle shape changes and natural volume
- An easy mid-length option for quick blending and everyday wear
- A wearable length that adds fullness without feeling dramatic
- Balanced everyday extensions for a natural-looking upgrade
- Longer daily-wear clip-ins with a manageable, realistic finish
FAQ
Do 24-inch clip-in extensions look natural in real life?
They can look extremely natural when undertone and texture match your hair and you style lightly to unify the transition. Soft waves are especially effective because they blur the line where your natural hair ends and the extensions begin.
Is 24 inches too long for everyday wear?
Not necessarily—many people wear 24 inches daily by choosing manageable coverage and using controlled styles on busy days. The key is comfort: if the install feels heavy, reduce pieces and prioritize even weight distribution.
How do I keep ultra-long clip-ins from tangling?
Brush gently before and after wear, avoid heavy product buildup, and store the hair neatly to reduce friction. Braids, low ponytails, and half-up styles also keep the length controlled when you’re moving around a lot.
What’s the easiest style to make 24 inches blend fast?
Loose waves are the simplest because they unify textures and hide transition points. If you prefer straighter looks, add a subtle bend through the mid-lengths so the finish looks natural rather than rigid.
How many wefts should I use for a natural look?
Use only what you need to match your natural density and create full ends. Most believable installs start with a lower-back foundation for length continuity, then add mid-zone fullness as needed.
Can I wear 24-inch clip-ins with short hair?
Yes, but you’ll typically need texture to hide the length jump. Curl your natural hair and the extensions together, then loosen the finish so it looks like one pattern rather than two separate textures.
How do I choose the right shade if my hair has dimension?
Match your mids and ends first, then look for undertone direction in daylight. Dimension often blends best when the extensions echo a believable gradient instead of a flat single tone.
What’s the biggest mistake first-time buyers make with 24 inches?
Buying based on length alone and ignoring undertone, texture match, and realistic wear habits. When you shop with a simple framework and plan for light blending, 24 inches becomes far easier to wear.
Are there styling ideas that help ultra-long hair look modern?
Yes—focus on movement and softness rather than rigid perfection. If you want a useful starting point for shape ideas, short-chic clip-in styles that emphasize shape over length can inspire silhouettes you can scale up beautifully at 24 inches.
Where should I start if I want to browse more than one option?
If you want to explore the broader catalog before committing to a specific finish, start at the Fabulive homepage for browsing collections by length and style, then return to the 24-inch category once you’ve clarified your shade, texture, and coverage preferences.
Conclusion encouraging browsing the collection
24 inch clip in hair extensions are the fastest route to a true “maximum length” silhouette—one that looks elevated in photos and powerful in real life when the blend is thoughtful. Match undertone in daylight, choose a texture you’ll actually wear, and build coverage that supports your natural density instead of overwhelming it. With controlled styling and low-friction care, 24 inches can feel surprisingly wearable, not intimidating. When you’re ready, browse the 24-inch collection and shop with intention: goal first, then shade, then texture, then construction—so the final result looks cohesive, comfortable, and unmistakably yours.