
-

24-Inch Clip-In Hair Extensions, Real Human Hair Double Weft, 100% Remy Design for Women
Regular price $249.00 USDSale price $249.00 USDUnit price per -

Clip In Hair Extensions Real Human Hair | 18-26 Inch 120 G 8pcs Seamless Clip In Hair Extensions
Regular price $246.36 USDRegular priceUnit price per$46.36 USDSale price $246.36 USD -

Clip In Hair Extensions Real Human Hair | Remy Human Hair Extensions Clip Ins For Women
Regular price $229.00 USDSale price $229.00 USDUnit price per -

14-20 Inch V-Shaped Real Remy Clip in Human Hair Extensions
Regular price $229.00 USDSale price $229.00 USDUnit price per -

Brown Brazilian Remy Straight Clip In Human Hair Extensions
Regular price $345.00 USDRegular priceUnit price per -


Brazilian Remy Straight Clip In Human Hair Extensions
Regular price $345.00 USDRegular priceUnit price per -

Human Hair Natural Blonde Clip In Extensions
Regular price From $346.99 USDRegular priceUnit price per -
Straight Clip in Hair Extensions Human Hair
Regular price $357.99 USDRegular priceUnit price per -

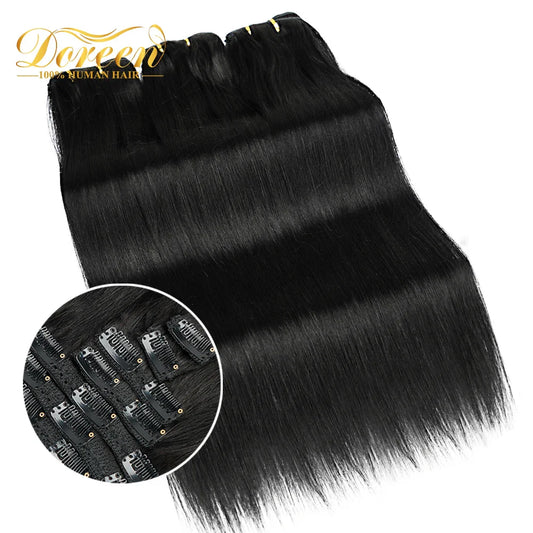
8 Pieces Straight Real Human Hair Clip In Hair Extensions | Remy Brazilian Black Human Hair | Double Wefted Clip In Hair Extension
Regular price $182.76 USDRegular priceUnit price per$82.76 USDSale price $182.76 USD


20 Inch Clip In Bonded Remy Human Hair Extensions: A Practical Long-Length Guide for Seamless Blend, Soft Glam, and Confident Wear
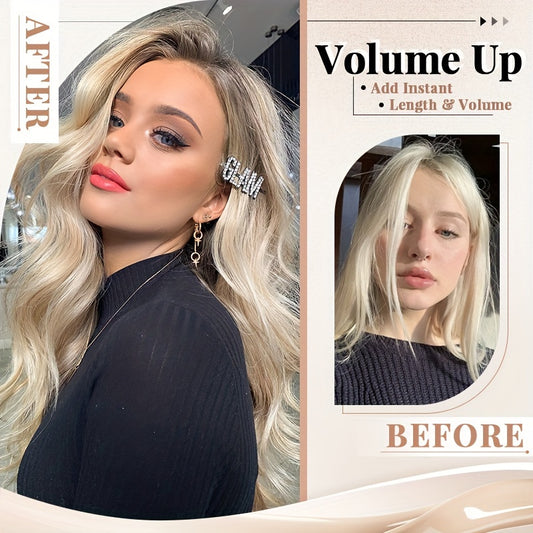
Twenty inches is the point where hair starts to look intentionally styled even on “simple” days: waves have more flow, ponytails fall longer, and the overall silhouette looks fuller from every angle. This collection is designed for shoppers who want that impact without a permanent method—clip in when you want length and volume, remove at night, and keep your routine flexible. Use the guide below to choose the right shade, undertone, texture, and coverage, then refine your pick based on comfort, maintenance, and how you actually style your hair.
If you’re exploring different textures, colors, and extension types before narrowing down to 20 inches, start at Fabulive’s homepage for browsing the full hair extension range and then filter by length and method once you’ve clarified your goal.
What this collection is and who it’s for
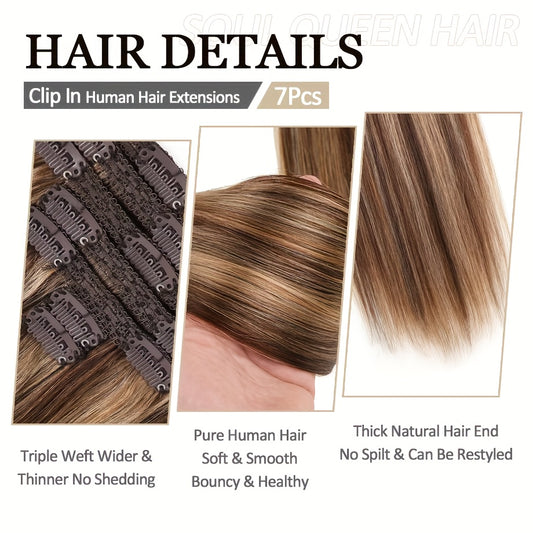
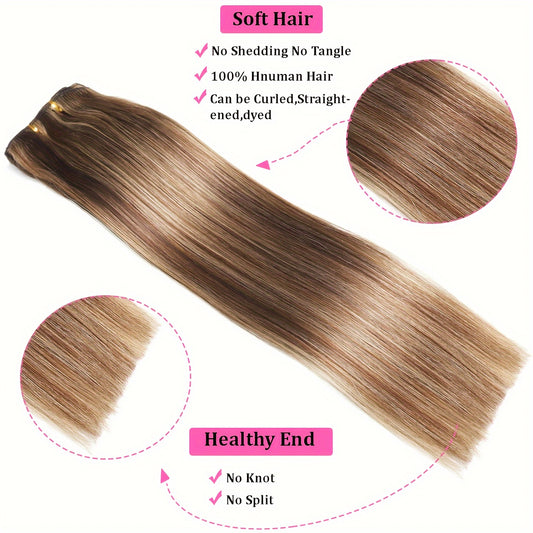
This collection focuses on 20 inch clip-in bonded Remy human hair extensions. Clip-ins are built for flexibility: you can add length and fullness for a day, a weekend, a trip, or an event, then remove them and store them properly for the next wear. “Remy” commonly refers to human hair that’s kept aligned in its natural direction, which often supports smoother movement and less tangling when you care for it gently. “Bonded” in this context points to construction choices that help the hair feel cohesive and stable during wear—meaning the set is more likely to sit neatly, distribute weight predictably, and hold its shape through styling.
Twenty inches typically lands around mid-back on many people, but the exact finish depends on height and torso length. That mid-back “finish point” is why this length is so popular: it reads unmistakably long in photos while staying more manageable than ultra-long options. It’s also a length that rewards styling—blowouts and brushed waves look more dimensional because there’s enough length to show shape.
Who benefits most from 20 inches when you want a noticeable but believable upgrade
If your natural hair is shoulder length or longer, 20 inches can blend beautifully, especially when you add a soft bend or wave. If your hair is shorter than shoulder length, 20 inches can still work, but realism depends more on placement and texture. In that case, your strategy is to create a smooth transition zone and avoid forcing a pin-straight finish that highlights the length jump.
Who should choose lighter coverage even if they want long hair
If your hair is fine, your scalp is sensitive, or you’re new to clip-ins, lighter coverage can look more premium than an overly dense install. The goal is balanced fullness: enough density to support your ends and improve the silhouette, but not so much that the crown feels bulky or the clips feel tight by midday.
How 20 inches reads on different heights and proportions
On petite frames, 20 inches can read closer to lower-back length; on taller frames, it may look like a classic long-hair baseline. A helpful way to decide is to think in finish point rather than inches: where you want the ends to land and how dramatic you want your ponytail to look from the side.
Why this category matters now
Long hair trends have shifted toward realism: softer shine, dimensional tones, and movement that looks touchable rather than stiff. Clip-ins fit this moment because they let you control your look without a long-term commitment. You can wear glam hair for an event, then go back to your natural routine the next day.
Twenty inches also sits in a practical “impact zone.” It creates a visible transformation in photos and mirrors, but it’s still easier to live with than ultra-long lengths that demand constant detangling and heavier product routines. If you want a clear sense of what this length delivers visually, explore how 20-inch extensions create glamorous, flowing hair and use that as your reference for the level of drama you’re aiming for.
Why 20 inches is a strong length for content, events, and everyday polish
At 20 inches, waves look more elongated, ponytails read more dramatic, and half-up looks instantly feel styled. It’s also a length that makes hair look fuller from behind, which is often the missing piece when natural ends are thin or uneven.
How to keep a long look current instead of overdone
A modern long-hair finish is about cohesion: matched undertones, consistent texture, and a surface layer that’s smooth without looking stiff. Choose one or two reliable finishes—sleek straight, brushed waves, or soft curls—and build repeatable habits that help you recreate them quickly.
How to choose the right option
Decision Framework
Use this method to choose a 20 inch clip-in bonded Remy set without getting overwhelmed:
- Goal → length, volume, color shift, or a mix
- Shade/undertone → match undertone first, then depth and dimension
- Texture/finish → straight, wave, curl; align sheen to your natural hair
- Construction/type → weft structure, clip layout, and how it sits on your head
- Weight/coverage → enough density to support ends without strain
- Occasion/frequency → daily wear needs comfort; occasion wear can be fuller
- Care tolerance → brushing, washing cadence, storage habits you’ll follow
- Budget/value → prioritize match, comfort, and repeatable results
Start with your blend zone and haircut shape
Your blend zone is where realism is won or lost: the point where your natural hair meets the added length. Before choosing a set, identify where your hair thins (ends, nape, sides) and plan to add density there first. When thickness increases gradually, the final result reads like one cohesive haircut rather than “hair plus hair.”
How to choose 20-inch clip-ins for thin hair right now without looking heavy
Thin hair typically needs distribution, not maximum grams. Use fewer pieces, place them where your natural hair has the most support, and keep the crown lighter so your top layer covers attachments. For a practical installation checklist that helps you build fullness without bulk, apply these clip-in volume techniques for balanced placement and focus on even coverage rather than stacking density in one row.
What looks most natural in daylight versus indoor lighting
Daylight exposes undertone mismatch and shine mismatch. Indoor lighting emphasizes silhouette and texture consistency. For daylight realism, match undertone carefully and keep the finish soft if your natural hair isn’t glossy. For indoor events, prioritize a uniform texture so the hair reads as one continuous style from top to ends.
How many pieces or wefts do you actually need for a believable 20-inch result
Think in zones: back fullness, side blending, and top coverage. Fine hair often looks best with moderate coverage plus a wave finish to soften transitions. Thick hair usually needs more coverage so the extensions don’t look too light compared to your natural density. The “right” amount is the amount that supports your ends without making your crown feel bulky.
How to choose coverage based on your haircut perimeter and density pattern
If your ends are wispy, you’ll prioritize perimeter support so the bottom looks full and intentional. If your ends are blunt, you’ll prioritize distributing thickness so you don’t create an obvious step. If your sides are thinner than your back, you’ll prioritize side blending so the hair looks consistent in profile, not just from the front.
Best choice for daily wear versus special occasions at 20 inches
For daily wear, comfort and security matter most: manageable density, stable placement, and a texture you can maintain without constant restyling. For special occasions, you can add more pieces and choose more dramatic styling because you’ll likely spend extra time refining the finish and wear the hair for fewer total hours.
Shade, undertone, and finish selection
At 20 inches, shade match matters more because there’s more visible hair in motion. Most “obvious extensions” issues come from undertone mismatch (warm vs cool) or finish mismatch (too shiny vs naturally soft). Your goal is to match the overall impression of your hair—especially through the mid-lengths—then refine with styling so everything moves together.
How to match undertones without overthinking it
Stand near a window and focus on your mid-lengths. If your hair reads caramel, honey, or golden, you lean warm. If it reads smoky, ash, or cool brown, you lean cool. If it looks balanced and shifts under different lighting, you may be neutral. Undertone match is often the quickest way to make extensions disappear.
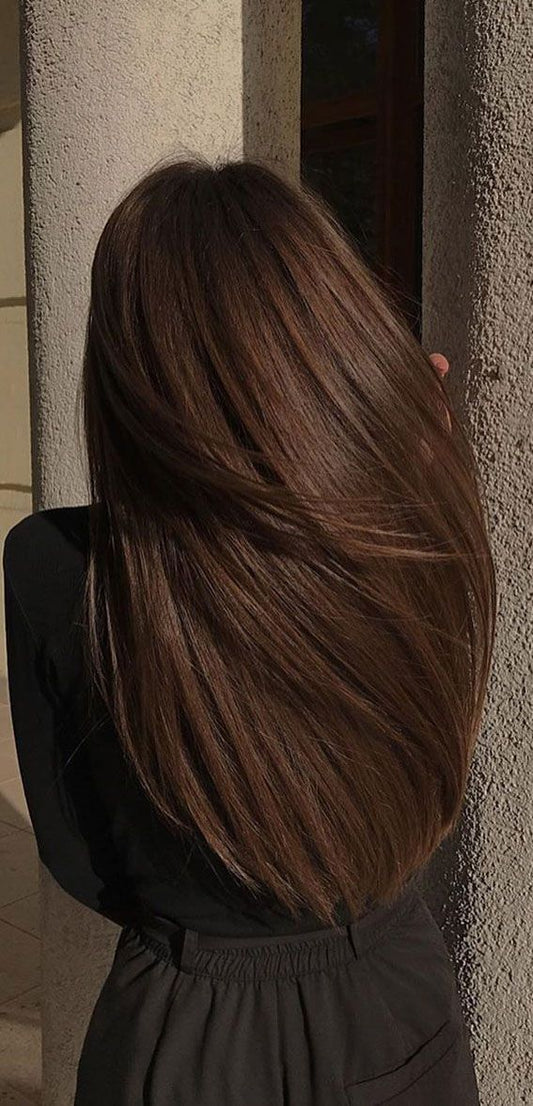
How to match balayage, highlights, and multi-dimensional brunettes
Choose the shade that matches your overall depth, then let dimension happen naturally. For multi-tonal hair, slightly varied extension tones can look more realistic than a flat match because natural hair is rarely a single uniform shade. In daylight, the goal is that the tones belong to the same family.
How to make black clip-ins blend seamlessly without harsh shine
Dark shades can reflect light strongly, so surface finish becomes crucial. Keep texture consistent, avoid heavy product buildup, and aim for soft sheen rather than glare. For deeper guidance, use this black clip-in blending guide for a seamless finish to align undertone and shine with your natural hair.
How to choose finish so the hair looks premium, not plastic-shiny
Even human hair can look overly shiny if products build up on the surface. Aim for controlled sheen: soft shine through mid-lengths, less shine near the root area, and smooth ends. Lightweight finishing products often look more natural than heavy oils, especially in daylight.
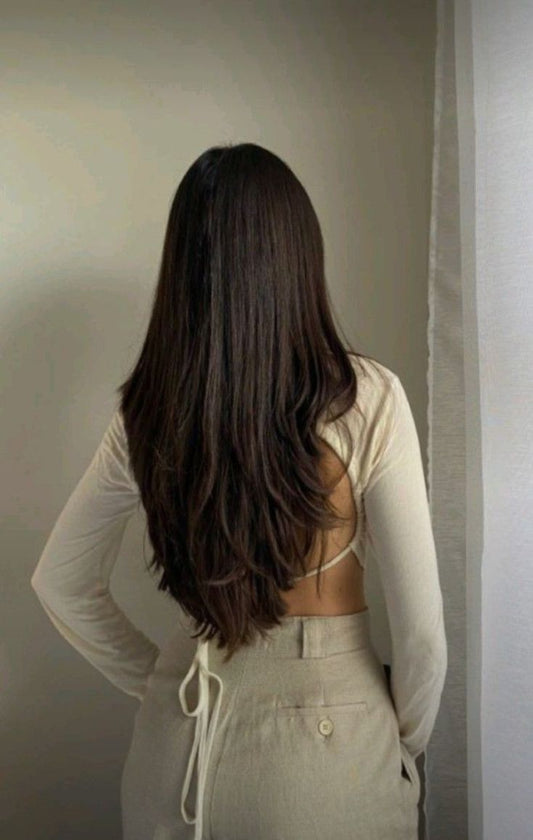
Texture and blend strategy
Texture is your blending shortcut. If texture doesn’t match, the hair can look like separate layers even if the shade is perfect. Decide how you wear your hair most often—straight, wavy, or curled—then choose and style the extensions to match that reality.
How to blend with blunt haircuts so the transition doesn’t look stacked
Blunt cuts create a strong perimeter line, which can make the transition into extensions more noticeable if pieces sit too low. Spread the hair across multiple levels so thickness increases gradually. Then style with a bend or wave to soften the line and create a cohesive silhouette.
How to blend with layered haircuts for seamless movement
Layers taper naturally, which helps extensions disappear. Place extensions slightly higher (still below the crown) so your layers fall over attachment points. Style your natural hair and extensions together so curl direction and wave pattern match from front to back.
How to blend with short hair when 20 inches feels like a big jump
If your natural hair is short, rely on texture and transition support. Waves break up the line where your hair ends, and smaller pieces near the blend zone help your ends merge into the added length. For starter-friendly ideas that translate to long blends, see short-chic clip-in styling ideas for better blending and apply the same principles: consistent texture, gradual density, and controlled volume.
Why extensions can be especially helpful for short-hair growth phases
When you’re growing out a cut, hair can feel awkward: layers don’t sit right, and the perimeter can look uneven. Clip-ins give you control over shape and silhouette while you wait for length to catch up. If you’re navigating that stage, read why extensions are a game-changer for short hair to align your expectations and choose a blending strategy that looks intentional rather than temporary.
What to do if the blend line shows at the back of your head
A visible blend line usually means placement is off: pieces too low, too concentrated, or not enough support near the transition zone. Move the lowest row slightly upward, add a smaller piece where your hair thins, and style with consistent texture so the hair behaves as one unit.
What to do if it looks bulky at the top or “helmet-like”
Bulk at the top happens when too much hair is placed too high. Keep the crown light and focus density through the mid-back of the head. If you want lift, create gentle root support and smooth the surface layer instead of adding more extension weight near the top.
How to reduce slipping without over-clipping your natural hair
If clips slip, they’re often placed into hair that’s too soft or too thin for the weight. Create a little grip at the root, clip into stronger sections, and avoid placing the heaviest pieces near the crown. Comfort improves when the set feels anchored, not tight.
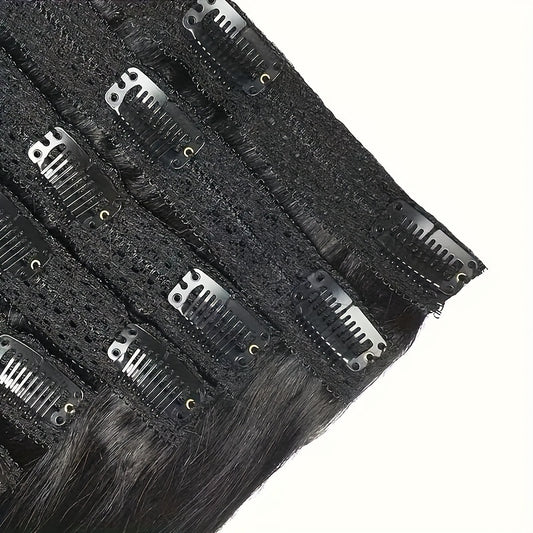
Construction and comfort: what matters more than you think
Length and color get most of the attention, but comfort is what determines whether you’ll actually wear your set. Construction affects how the hair distributes weight, how easily it blends, and how secure it feels through a full day. Two 20-inch sets can look similar in photos yet feel very different in real life depending on weft structure and piece layout.
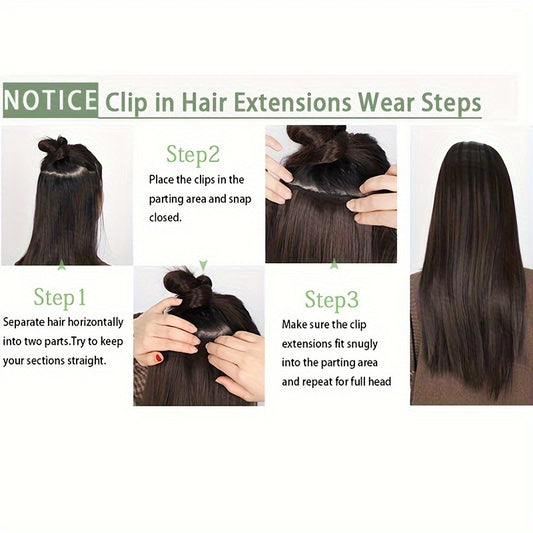
How to choose a clip-in layout that stays comfortable all day
A comfortable layout spreads weight across more than one level rather than relying on a single heavy row. It also clips into strong sections, not delicate hair near the crown. If you feel pressure, reduce the number of pieces and reposition so weight sits where your hair is densest.
Double weft vs single weft: why this decision affects realism and feel
Weft structure influences both coverage and comfort. Some people prefer a lighter feel with flexible coverage, while others want fuller density that fills in the back more dramatically. If you’re deciding what will suit your scalp and density best, review this double-weft versus single-weft breakdown and choose based on how you plan to wear and style the hair.
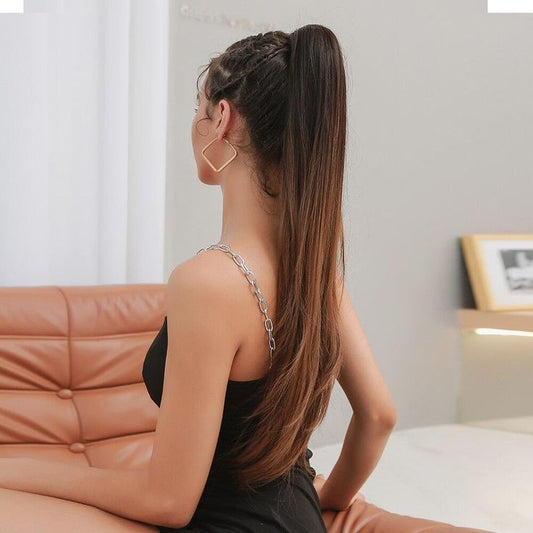
Styling ideas
Twenty inches gives you styling range: brushed waves, flowing ponytails, and half-up looks that instantly feel elevated. Choose styles that support blending. Sleek styles highlight shade and thickness differences; textured styles hide small inconsistencies and often look more natural, especially while you’re perfecting placement.
Quick looks for busy days
- Low ponytail with a wrapped base and softly waved ends
- Half-up twist with a smooth top layer and loose lengths
- Loose brushed waves with a center part for everyday glam
- Claw-clip updo with soft tendrils for a relaxed finish
Photo-ready looks for events and content days
For camera-friendly hair, set curls, let them cool fully, then brush into waves for a smooth surface. For event inspiration that adapts beautifully to added length, use prom hairstyle ideas you can translate to longer hair and recreate the shapes with a fuller finish.
Bandana and accessory styling that looks deliberate, not like a cover-up
Accessories look best when the base is polished. Smooth the top layer, keep attachment points fully covered, then add your accessory as a style choice. For ideas that pair well with long lengths, try bandana hairstyle inspiration for elevated everyday looks and keep the sides sleek.
Celebrity-inspired movement without over-styling
Many celebrity looks are simple at their core: consistent texture, controlled volume, and a smooth surface layer. Choose one curl direction, keep waves uniform, then brush out for softness. For reference looks that translate well to 20 inches, browse celebrity hairstyles that translate into real-life styling and focus on the shapes.
How to make a long blowout hold its shape longer
Blowouts last longer when you set and cool the hair in shape. Create bend through the mid-shaft, allow it to cool, then brush gently for movement. Avoid heavy oils early; use lightweight finishing products so the hair stays cohesive and doesn’t separate.
Care, maintenance, and longevity
Longer extensions experience more friction—against coats, scarves, car seats, and during travel—so care matters. Great care is mostly about gentle habits: brush carefully, wash sparingly, protect from unnecessary heat, and store properly. These steps preserve softness, reduce tangling, and keep the hair looking cohesive over time.
How often to wash 20-inch clip-ins for best softness
Wash only when there’s visible buildup, heaviness, or tangling that brushing can’t solve. Over-washing can dry hair out and reduce longevity. When you wash, use lukewarm water, gentle products, and condition mostly from mid-lengths to ends.
Brushing rules that prevent matting at the nape
Brush from ends upward in small sections, holding the hair near the clips so you don’t pull. Detangle before and after each wear. The nape is friction-heavy, so keep that area smooth and avoid rough fabrics when possible.
Heat styling without losing softness and movement
Use heat protectant and moderate temperatures, and avoid repeated passes over the same section. If you love curls, set them once and refresh lightly rather than re-curling from scratch. Less heat typically means longer-lasting softness and fewer split ends.
Storage habits that protect shape and reduce tangling
Store clip-ins fully dry and detangled. Avoid compressing them under heavy items, and keep them protected from friction. Good storage is one of the biggest “longevity multipliers,” especially at longer lengths.
Comparing nearby categories
Length is a lifestyle decision. The biggest differences between adjacent lengths are how dramatic the result looks, how much brushing you’ll do during wear, and how much styling time it takes to feel “finished.” If you’re unsure, compare lengths based on your routine and care tolerance, not just the look in a single photo.
How 18 inches compares when you want long hair with easier upkeep
Eighteen inches is still long, but it typically requires slightly less brushing and can feel easier for regular wear. If you want long hair that stays very wearable, compare with 18-inch clip-ins for a naturally long finish.
When 22 inches makes sense for more dramatic styling
Twenty-two inches delivers a more statement look, especially in waves and braids, but it also demands more care and detangling. If you want extra drama, browse 22-inch clip-ins for extra drama in length and plan for more brushing and careful storage.
What 24 inches is best for when you want maximum impact
Twenty-four inches is for high-impact hair moments: content days, formal events, and ultra-long styling. It’s stunning, but higher maintenance. See 24-inch clip-ins for maximum-length impact if you’re planning a true statement look.
How this fits into the broader 20-inch ecosystem
If you want to compare other 20-inch formats or simply see the wider range of 20-inch options across styles and methods, browse the broader 20-inch hair extensions collection for comparisons and use it to sanity-check your goals for density, texture, and finish.
Featured picks and use-case recommendations
Shopping by outcome prevents common mistakes like choosing too much density for fine hair or picking a texture you won’t maintain. Use the scenarios below to decide what fits your lifestyle first, then refine shade and texture.
Best for soft glam waves that look full without extra teasing
If you want a visible wave pattern that photographs beautifully, consider 20-inch wavy clip-in hair extensions for soft-glam movement and blend the top layer with a gentle bend so your natural hair and extensions behave like one style.
Best for sleek styling when you want a clean, polished silhouette
For straight looks that feel refined, choose a texture that matches how your hair behaves when straightened. A strong option to compare is Brazilian Remy straight clip-in human hair for sleek finishes, especially if you prefer a smooth outline and minimal frizz.
Best for warm-toned straight styling that stays natural-looking
If you like a warmer brown finish and want straight hair that reads believable, explore a warm brown Brazilian Remy straight clip-in option for everyday polish and match undertone at your mid-lengths first.
Best for comparing longer lengths beyond 20 inches
If you’re tempted to go longer for a bigger transformation, compare how longer hair behaves with Brazilian Remy lengths that extend beyond 20 inches. Longer hair looks incredible, but it requires more brushing, more careful storage, and more moisture at the ends.
Best for maximum-length days with fuller, double-weft coverage
If you want a very long look and prefer fuller coverage, consider 24-inch double-weft Remy clip-ins for high-impact styling and style in waves to soften transitions.
Best for comparing clip-ins with longer-wear pre-bonded formats
If you’re deciding between occasional wear and longer-wear formats, it helps to understand the commitment difference. For comparison shopping, view pre-bonded I-tip Remy extensions for longer-wear installs and consider whether your routine supports consistent upkeep.
Buying guidance and common mistakes to avoid
Twenty inches can look incredibly natural when chosen well, but it can magnify small mismatches. Before you buy, think about your real routine: how often you’ll wear the hair, whether you’ll heat-style, and how you’ll store it between uses. The best purchase is the one you’ll actually wear.
Common mistake: matching ends instead of matching mid-lengths
Ends are often lighter and more porous than mid-lengths, so matching them can throw off the overall blend. Match mid-lengths first, then use styling to integrate ends. This matters more at 20 inches because there’s more hair visible in motion.
Common mistake: placing all the weight too low at the nape
Low placement increases tangling where friction is highest and can create a visible line when you move. Distribute pieces so density increases gradually through the mid-back of the head. A smooth gradient looks more natural and usually feels more comfortable all day.
Common mistake: buying without understanding clip-in basics
Clip-ins are straightforward, but details matter: placement, weight distribution, and blending the top layer. If you want a comprehensive overview before choosing, read everything to know before buying clip-in hair extensions and map the guidance to your hair density and styling habits.
Common mistake: treating clip-ins like a one-time trick instead of a repeatable routine
The most polished results come from a repeatable method: a consistent placement map, one or two signature styles, and a simple care routine. If you want a straightforward overview of clip-ins as a transformation tool, read how clip hair extensions create fast, flexible transformations and build a routine you can repeat without stress.
FAQ
How long do 20-inch clip-in extensions look on most people?
On many people, 20 inches lands around mid-back, though height and torso length change the finish point. On petite frames it can read longer; on taller frames it may look like classic long hair. The most reliable approach is to think in finish point rather than the number on the label.
Do 20-inch clip-ins look natural for everyday wear?
They can look very natural when undertone, texture, and finish match your hair. For daily realism, distribute weight evenly and keep the crown light so the top layer covers attachment points. Soft waves tend to blend more easily than ultra-sleek straight styles.
Can I wear 20 inches if my hair is fine?
Yes, but fine hair does best with moderate coverage and smart distribution. Avoid placing large pieces too high and don’t overload one row at the nape. If your scalp feels sore, reduce pieces and redistribute to stronger sections.
What if my extensions look too shiny compared to my natural hair?
Shine mismatch is common and usually fixable. Use a light dry texture spray to soften reflection and avoid heavy oils on the surface. Matching finish is often as important as matching shade, especially in daylight.
How do I prevent tangling during the day?
Brush gently in sections, especially at the nape where friction is highest. Keep hair forward when wearing scarves or high collars, and avoid layering too many sticky products. Detangling before storage reduces knots next wear.
What’s the most natural-looking style for 20-inch clip-ins?
Brushed-out waves are often the most forgiving because they unify texture and disguise small shade differences. Keep the top layer smooth and maintain consistent curl direction. Once you find a “signature wave,” repeating it makes your look consistently polished.
How do I avoid clip bumps showing near the top?
Clip bumps happen when pieces are placed too high or clipped into hair that’s too thin for the weight. Keep the crown lighter, clip into stronger sections, and leave enough natural hair on top to drape over attachment points. A gentle tease at the root can add grip without visible bulk.
What’s the fastest way to learn placement without frustration?
Start simple: one main row for back fullness, side pieces for blending, then adjust. Check the back with mirrors so you can spot gaps early. If you want a friendly, confidence-building approach to the learning curve, see this no-drama guide to mastering clip-ins and build your routine from there.
Related collections
If you’re still deciding how subtle or dramatic you want your upgrade to feel, these related clip-in lengths can help you compare shape, maintenance, and everyday wearability while staying within the same shopping silo:
- Which 10-inch clip-in set is best if you want subtle volume without a big length change?
- Is 14 inches the easiest clip-in length for bouncy medium styles?
- Would 15-inch clip-ins suit daily wear when you want a natural-looking upgrade?
- Are 16-inch clip-ins the most comfortable option for low-maintenance long hair?
Conclusion encouraging browsing the collection
20 inch clip-in bonded Remy human hair extensions are for people who want unmistakable length, fuller ends, and styling that photographs beautifully—without the commitment of installed methods. When you match undertone, choose a realistic finish, and distribute weight for a smooth gradient, the result can look seamless in daylight and striking in photos. When you’re ready to shop by texture, density, and the outcome you want, browse the full collection at 20-inch clip-in bonded Remy human hair extensions for long, polished results and use the framework above to make a confident final pick.